User guide
The customer portal, screen by screen
Everything you can do in the portal, explained in plain language with numbered screenshots: open an account, ask for a price, accept an offer, follow your cargo and download your paperwork.
Go to portal.barketsalah.comThe portal opens in your browser. There is nothing to install, and it works on a phone too.
The screenshots below are of the English interface. Your portal shows the same screens in the language you picked, so a button named here will read in your language on your own screen.
Creating your account
This screen is where you open your own portal account. Registration has two steps: first you fill in your details, then you read and accept the terms. When you finish, the system signs you in automatically, so you do not need to log in again.
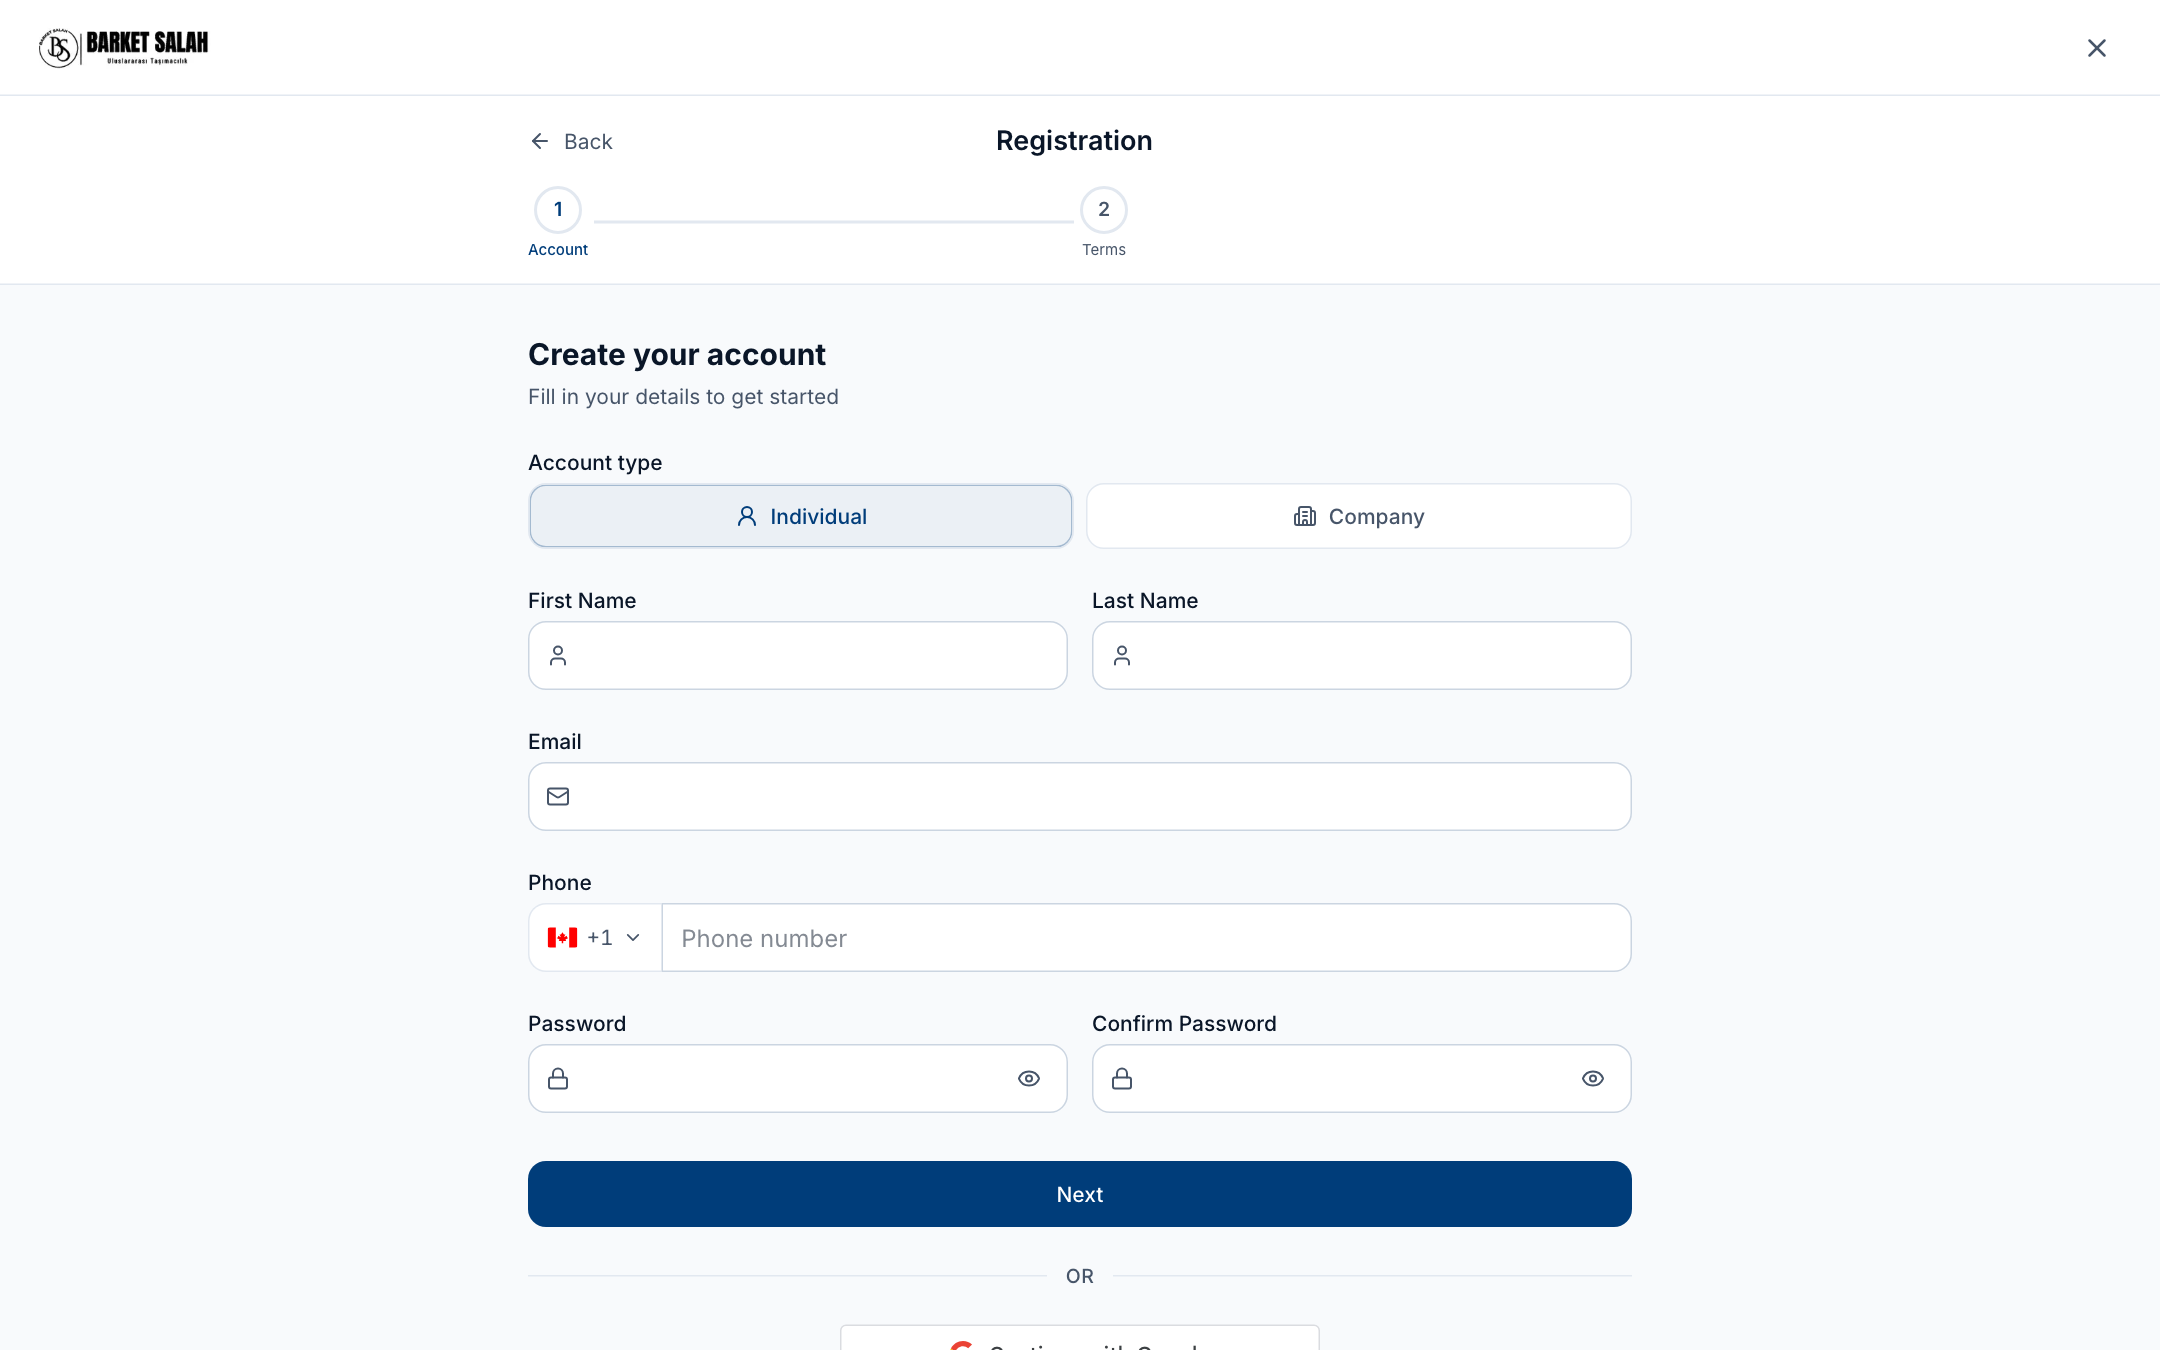
- 1. Choose whether you are registering as an individual or on behalf of a company. Choosing Company adds a company name field.
- 2. Type your first and last name.
- 3. Type your email address. You will sign in with it, and the verification email goes here.
- 4. Type your phone number. Click the flag on the left to change the country code.
- 5. Type your password twice. It must contain a lowercase letter, an uppercase letter, a digit AND a symbol, with no spaces.
- 6. Once the fields are filled in, press Next to go to the terms step.
- At the top of the page you see "Account type". Click one of the two boxes below it. Choose "Individual" if you are registering for yourself. Choose "Company" if you are registering for a business. The box you pick becomes highlighted.
- If you chose "Company", a "Company Name" box appears right below. Type your company's name. You cannot continue if this box is empty. If you chose "Individual", skip this step.
- Type your first name in the "First Name" box and your last name in the "Last Name" box. Both are required.
- Type your email address in the "Email" box. You will use this address to sign in. It must look like name@company.com.
- In the "Phone" box, first pick your country from the list on the left. Then type your number. Phone is optional, you can leave it empty.
- Type a new password in the "Password" box. As you type, a list appears below it. Keep adjusting the password until every line in the list has a green tick. If any line still shows a cross, the password will not be accepted.
- Type the same password again in the "Confirm Password" box. The two must match exactly. Then click the "Next" button.
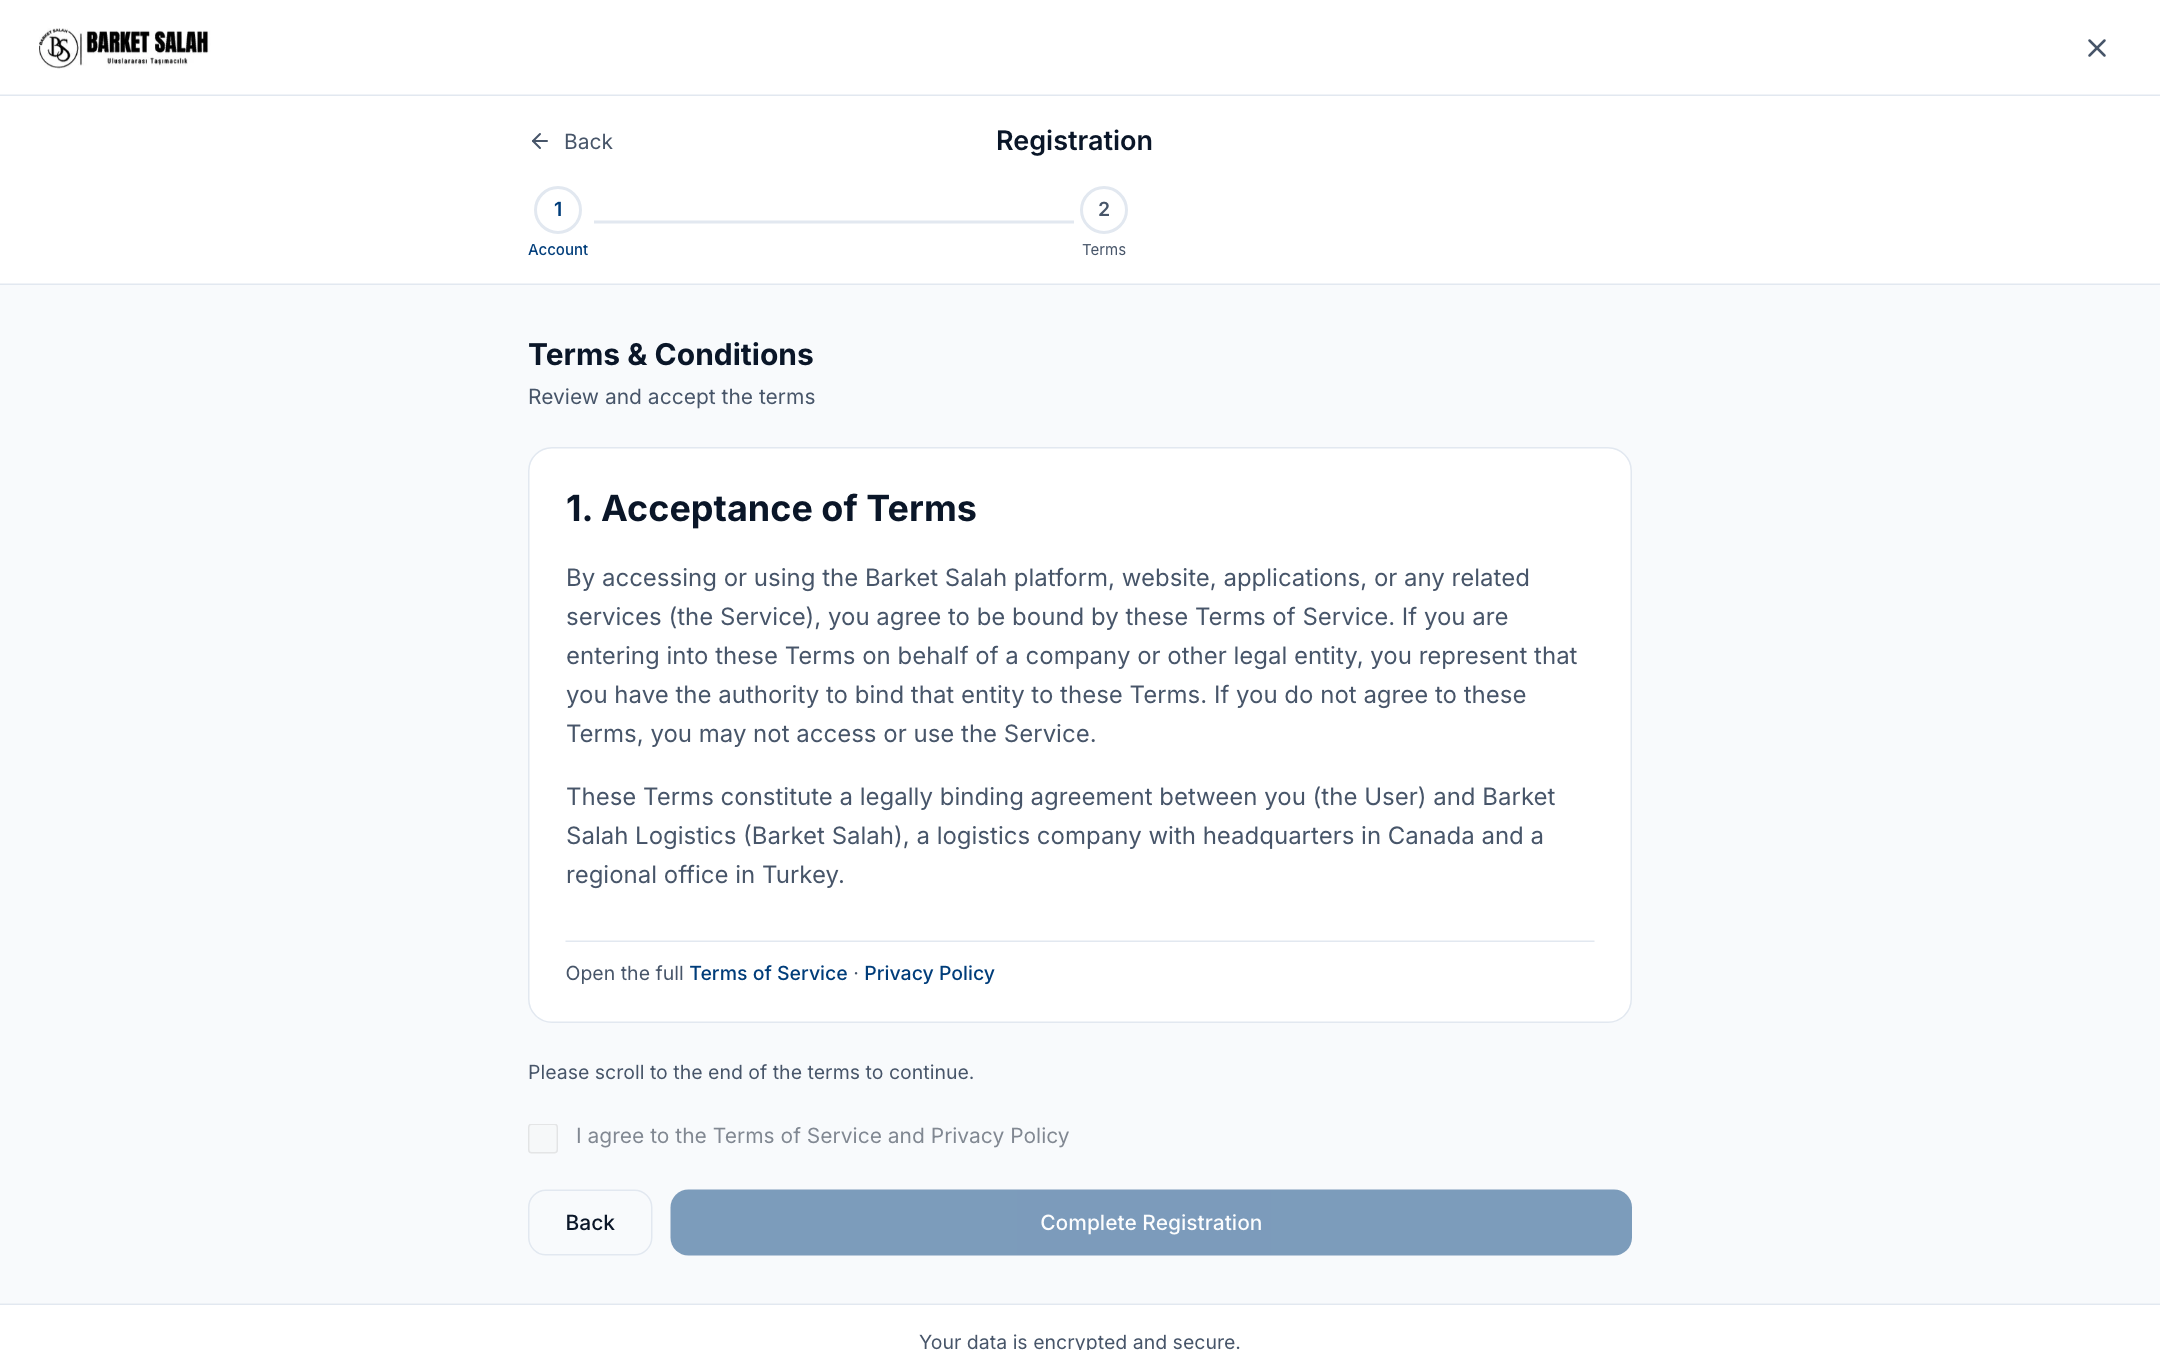
- 1. The agreement is inside this box. Hover over it and scroll all the way to the bottom.
- 2. While this warning is showing you still have further to scroll. It disappears when you reach the end.
- 3. The checkbox starts greyed out and cannot be clicked. It becomes active once you scroll to the end; then tick it.
- 4. Ticking the box turns this button solid. Press Complete Registration; your account is created and you are signed in automatically.
- On the second step the "Terms & Conditions" text appears. Click inside the text and scroll all the way to the bottom.
- Click the checkbox below the text. Then click the "Complete Registration" button and wait for the page to load.
Tip
Watch out
Good to know
Signing in
This is the screen where you sign in to the portal. You can use your email and password, or your Google account. After you sign in you land on the dashboard, where your quotes, orders and documents are.
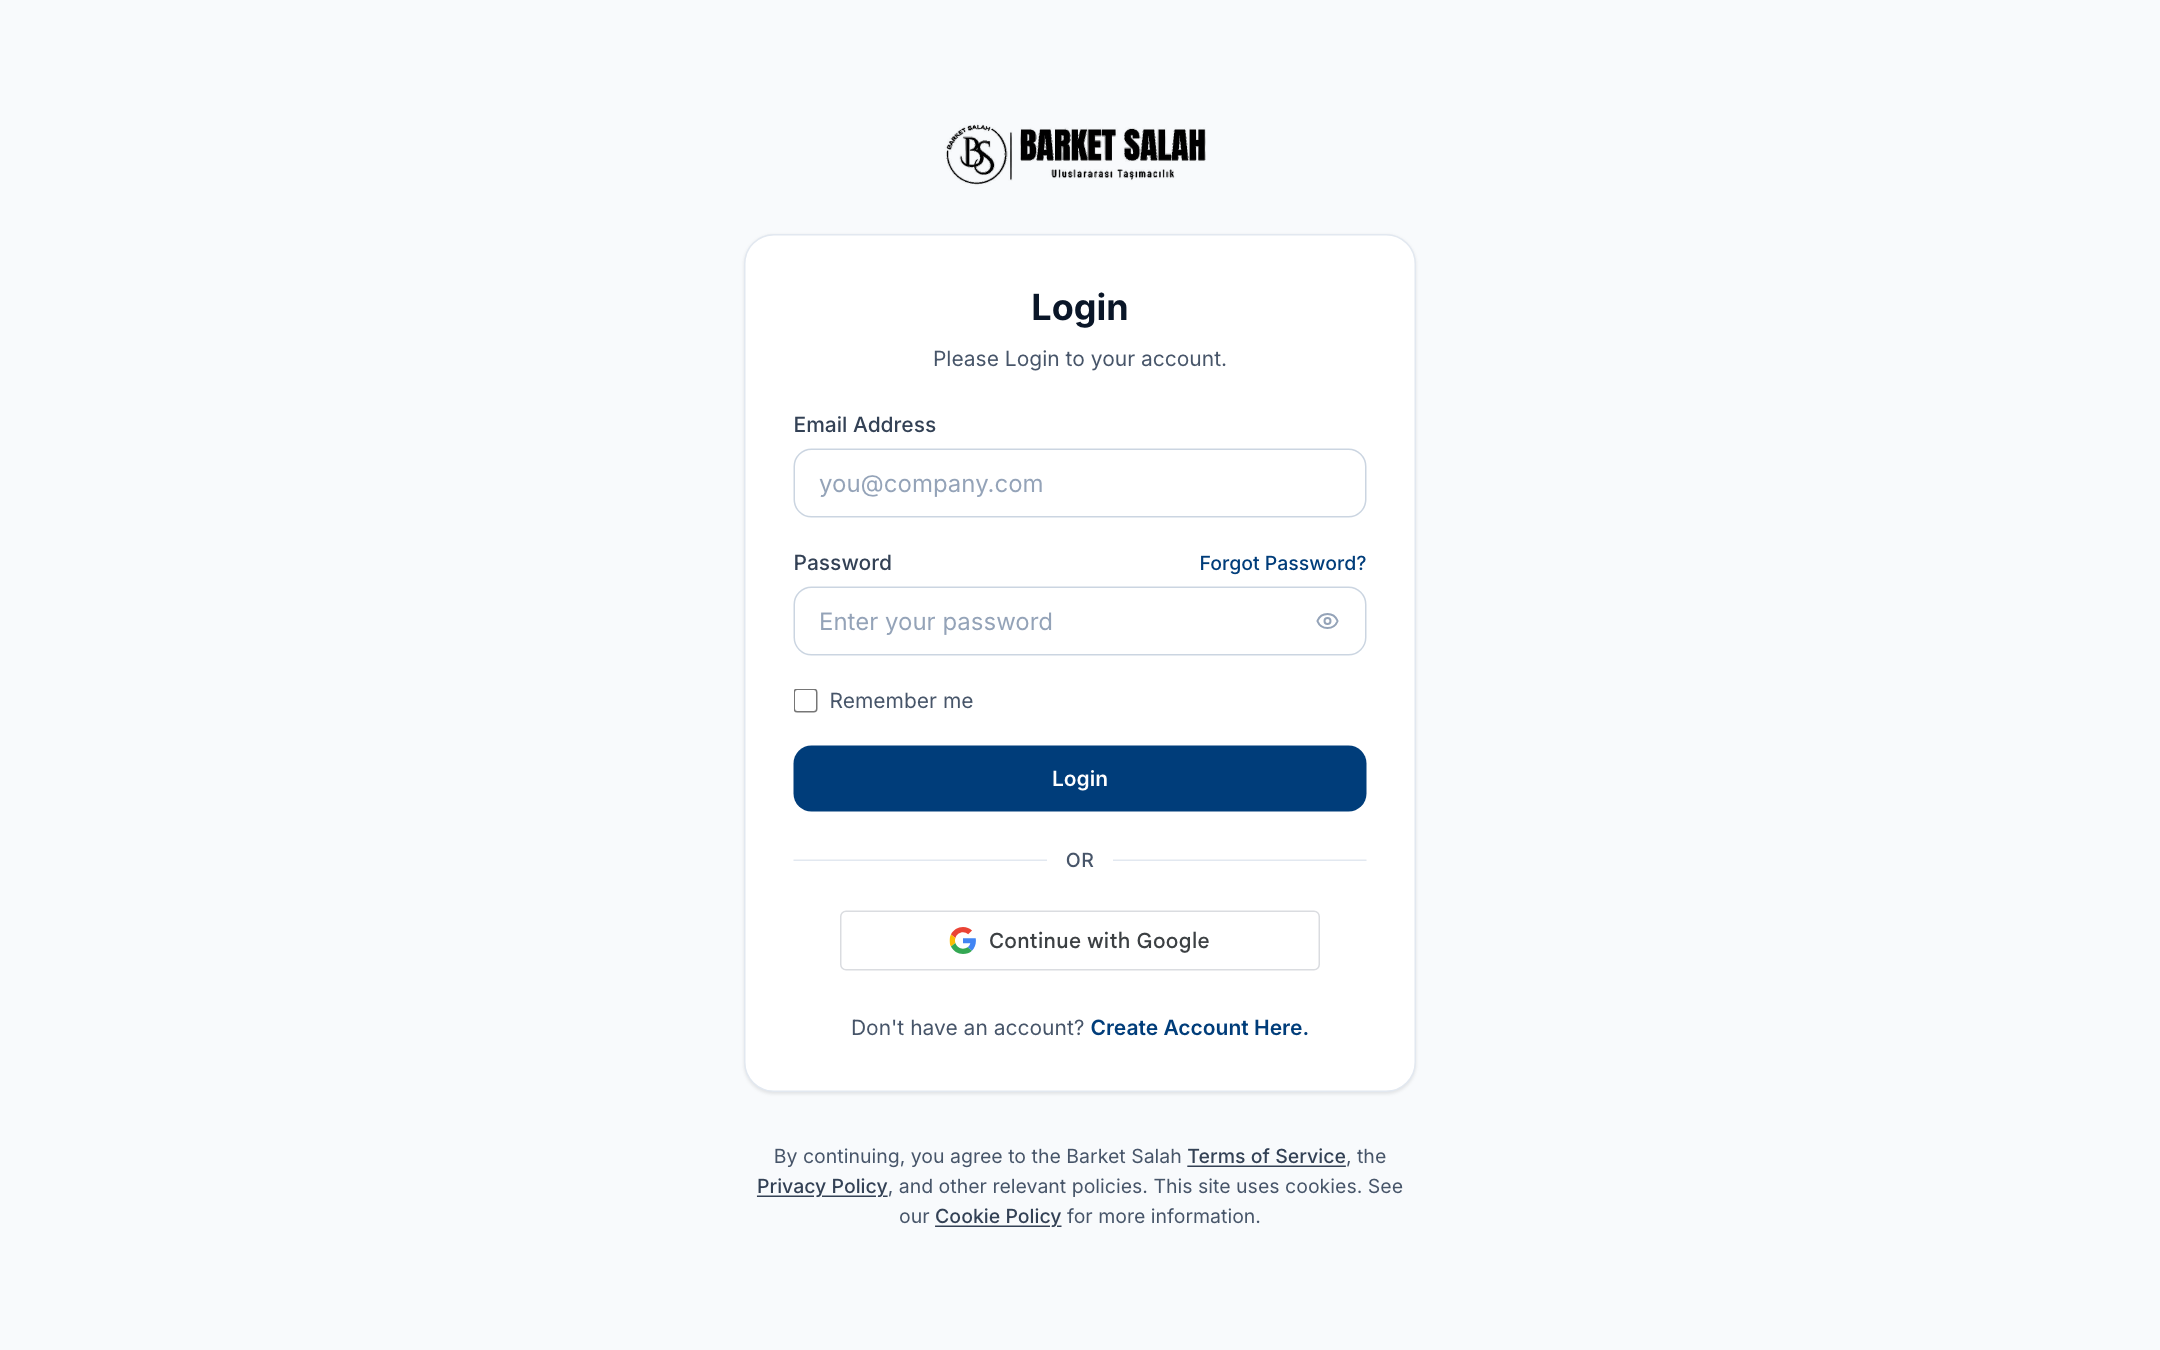
- 1. Type your email address here.
- 2. Click here if you forgot your password; a reset link is sent to your email.
- 3. Type your password here. Tap the eye icon on the right to see what you typed.
- 4. After entering your details, press this blue Login button.
- 5. Press here to sign in with your Google account instead of typing a password.
- 6. If you have no account, click here to create a new one.
- Open the portal address in your browser. The "Login" screen appears.
- Type your email address in the "Email Address" box.
- Type your password in the "Password" box. To see what you typed, click the eye icon at the right of the box.
- If you want, tick the "Remember me" box.
- Click the "Login" button. If your details are correct, you go to the dashboard.
- If the screen asks for a 6-digit code, type the code from your authenticator app and click "Verify". If you do not have your phone with you, click "Use a recovery code instead".
- To sign in with Google, click the Google button below the "or" line and pick your account.
- If you forgot your password, click "Forgot Password?", type your email address and click "Send reset link". Set your new password from the link in the email, then come back to the login screen and sign in with the new password.
Tip
Watch out
Good to know
Dashboard
The Dashboard is the first screen you see after you sign in. It shows a summary of your deals, shipments and invoices on a single page. It lists what is waiting for you at the top, shows where your vessels are on the map, and lets you jump to any section with one click.
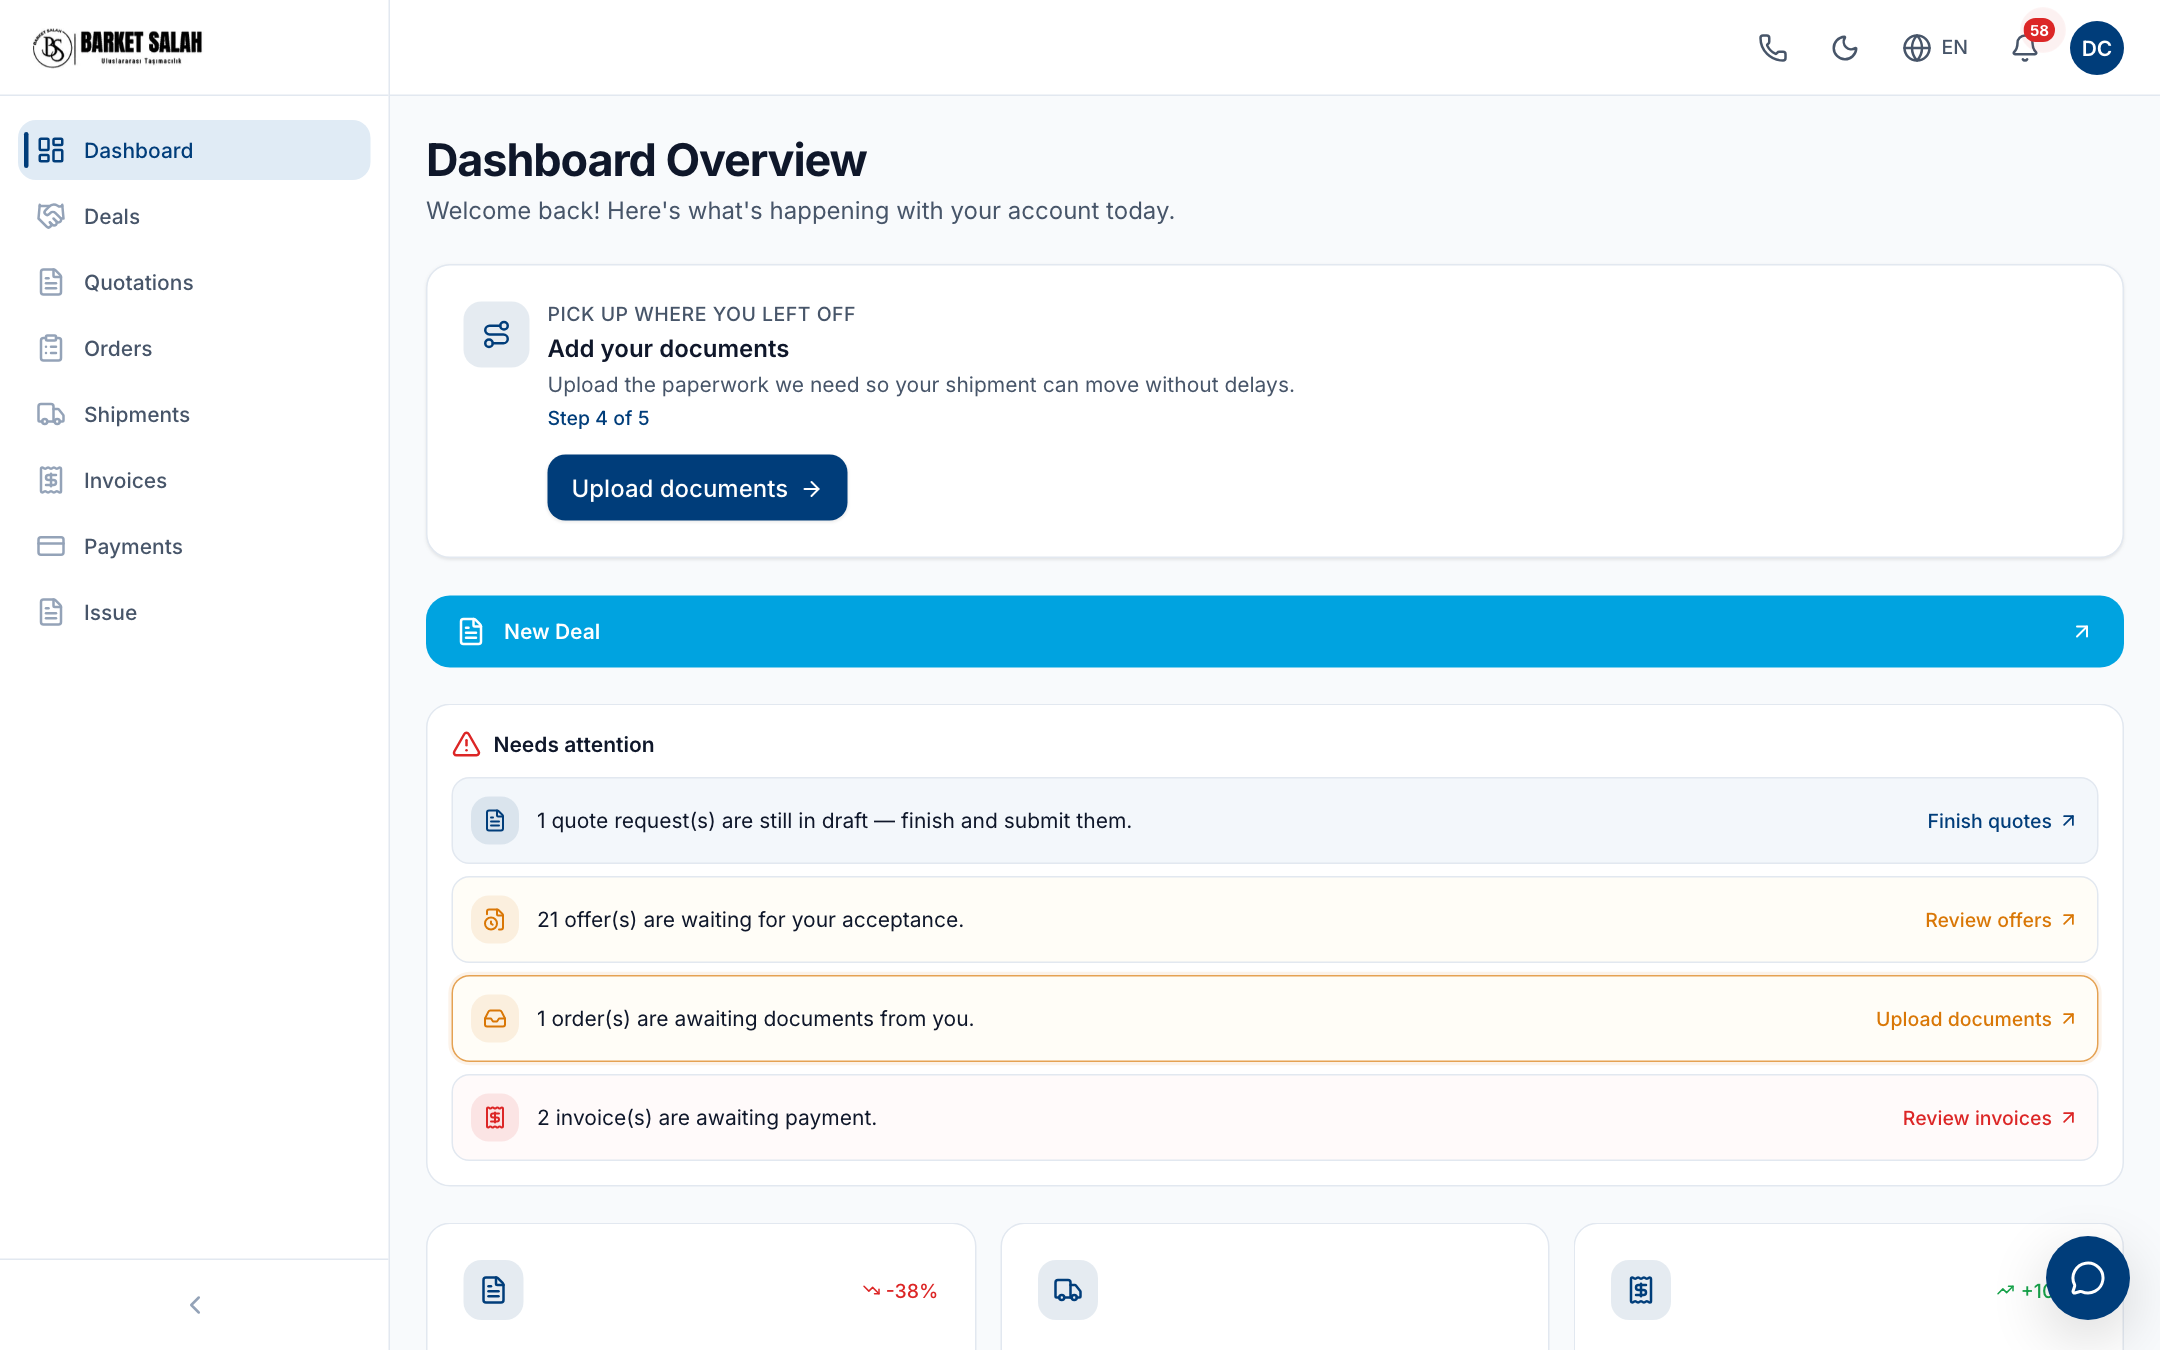
- 1. Click the bell for your notifications. The red number counts unread notifications together with the items waiting for you.
- 2. Click EN to change the interface language.
- 3. Use this menu to open your deals, quotations, orders, shipments and invoices.
- 4. Pick up where you left off: this button opens your orders, filtered down to the ones waiting for documents.
- 5. The wide blue band starts a new request. Click it when you want a price for something.
- 6. Everything waiting on you is listed here — drafts to finish, offers to review, documents to upload, invoices to pay. Each row has its own button on the right.
- Sign in. The portal takes you straight to the Dashboard. To come back from another page, click "Dashboard" in the left menu.
- The wide blue "New Deal" band starts a new request. Click it whenever you want a price for something.
- Read the "Needs attention" box. It lists what is waiting for you: unfinished draft requests, offers waiting for your acceptance, orders waiting for documents, unpaid invoices and delayed shipments. Click the line you care about and the portal takes you straight to that list. If nothing is pending, you see a green "All clear" message in the same place instead.
- Look at the three number cards: "Active Deals", "Active Shipments" and "Open Invoices". To see the full list, click the "View All ..." link under the card.
- In the "Vessel Map" section, see where your vessels are. The coloured chips in the heading tell you how many are in transit, at port, delayed or arrived. Click "Full Screen Map" to open a bigger map. On a phone, move the map with two fingers; one finger scrolls the page.
- Click a row in the "Recent Activity" list. The detail page of that request, offer, order or invoice opens.
- Click an entry in the "Upcoming Deliveries" box. Each entry shows the tracking number, the route and the estimated arrival date (ETA); clicking it opens the shipment detail.
- Scroll to the "Analytics" section at the bottom of the page. Review the monthly volume charts, then click "Export CSV" to download the table to your computer or "Print" to print it.
Tip
Good to know
Watch out
Creating a quote request
This screen is where you ask Barket Salah for a price for the cargo you want to move. You fill in the form step by step: what you are shipping, where it goes from and to, and the addresses. When you submit the request it goes to the carriers and offers start arriving in the portal.
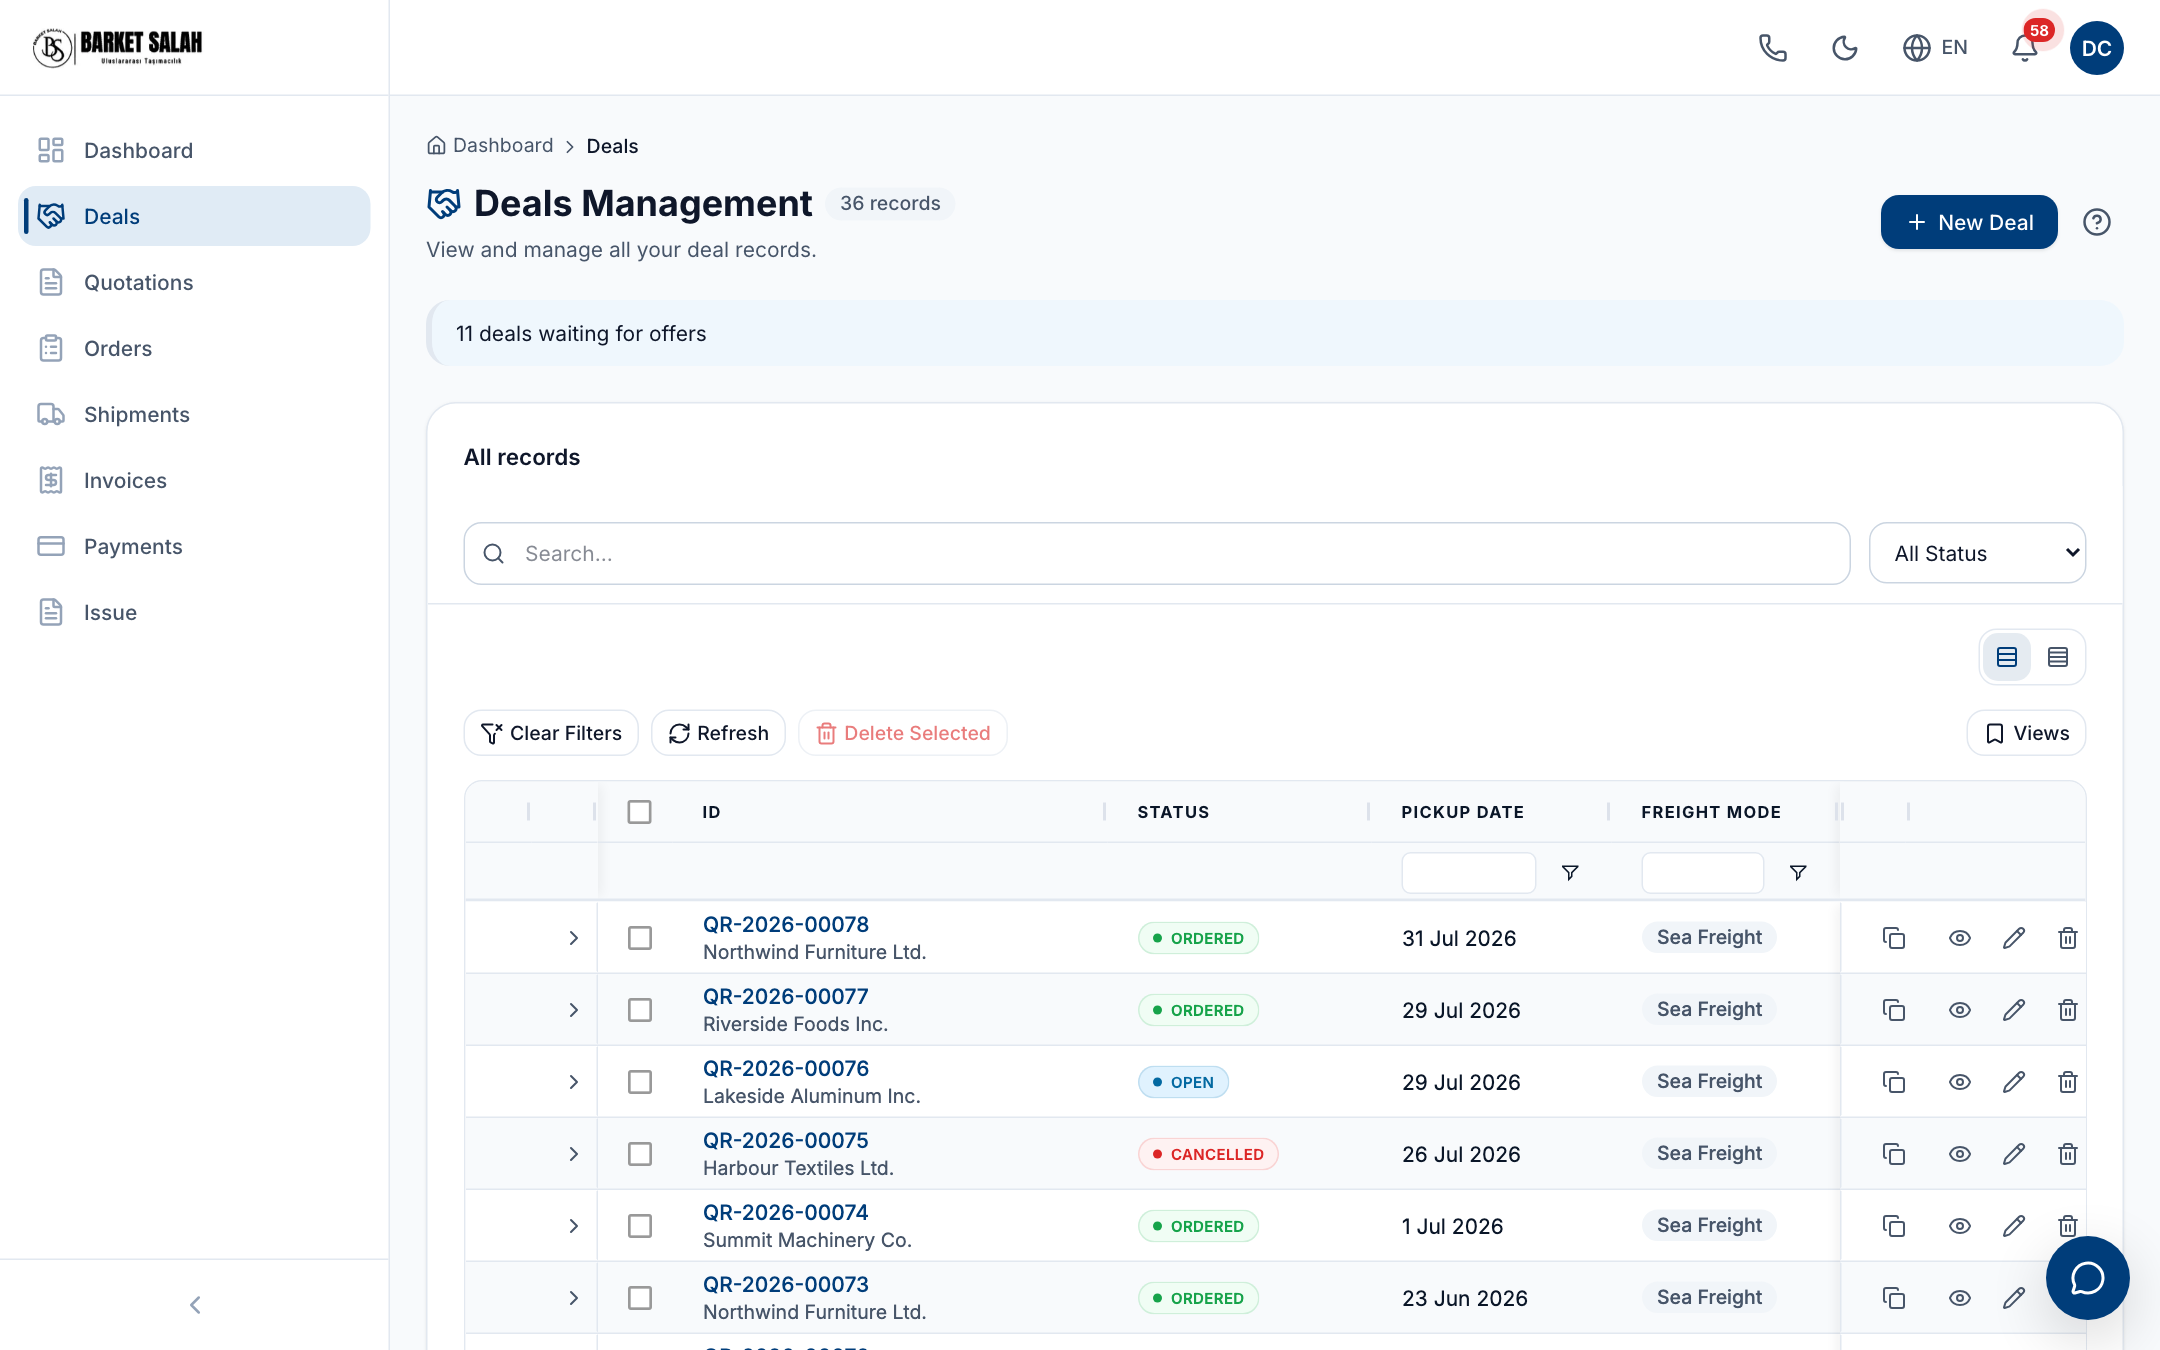
- 1. Click Deals in the left menu to see your deal requests.
- 2. Press the New Deal button to create a new deal request.
- 3. See how many of your deals are waiting for offers in this info bar.
- 4. Type the deal number you are looking for. The search matches the number, not the company name.
- 5. Pick a status here to filter the list by status.
- 6. Read each deal's stage from the colored status badge.
- Click "Deals" in the left menu. Then click the "New Deal" button at the top right. An empty quote request form opens.
- Pick the freight mode: sea, air or road. This choice changes the fields on the form. Sea shows port fields, air shows airport fields, road shows border crossing fields. Pick this first, then fill in the rest.
- If you have used a route before, click the "Saved Route" box and pick one from the list. Origin country, destination country, port and similar fields fill in by themselves. If something fills in wrong, click it and change it by hand.
- Add the loading address and the delivery address. In each row pick an address from the "Saved Address" box; company, contact, address, city, country and postal code fill in by themselves. If your address is not in the list, type the fields by hand. The address you type is there in the list next time.
- Fill in the cargo details. Fields with a star next to them are required, you cannot leave them empty. Fields without a star can be left empty if you do not know them.
- Click "Continue" to move to the next step. If the page does not move, a required field on that step is empty. The name of the missing field is shown next to the button and the screen takes you straight to it. Fill it in, then click "Continue" again. The bar at the top shows how many steps are left. Click "Back" to return to the previous step.
- On the last step click "Save & exit". Your request is saved as a Draft. At this point the request has not gone to anyone yet.
- On the screen that opens click "Review & submit for offers". The request page opens. Read the details one last time, then click the "Submit" button. Only after this does your request go to the carriers and offers start coming in.
Watch out
Tip
Watch out
Offers you receive
When the company prepares a price for your request, the offer shows up on this screen. You see each offer's status, amount, carrier and last valid date here. You accept the one you like, and the accepted offer becomes an order. You cannot create offers yourself — you only view and accept them.
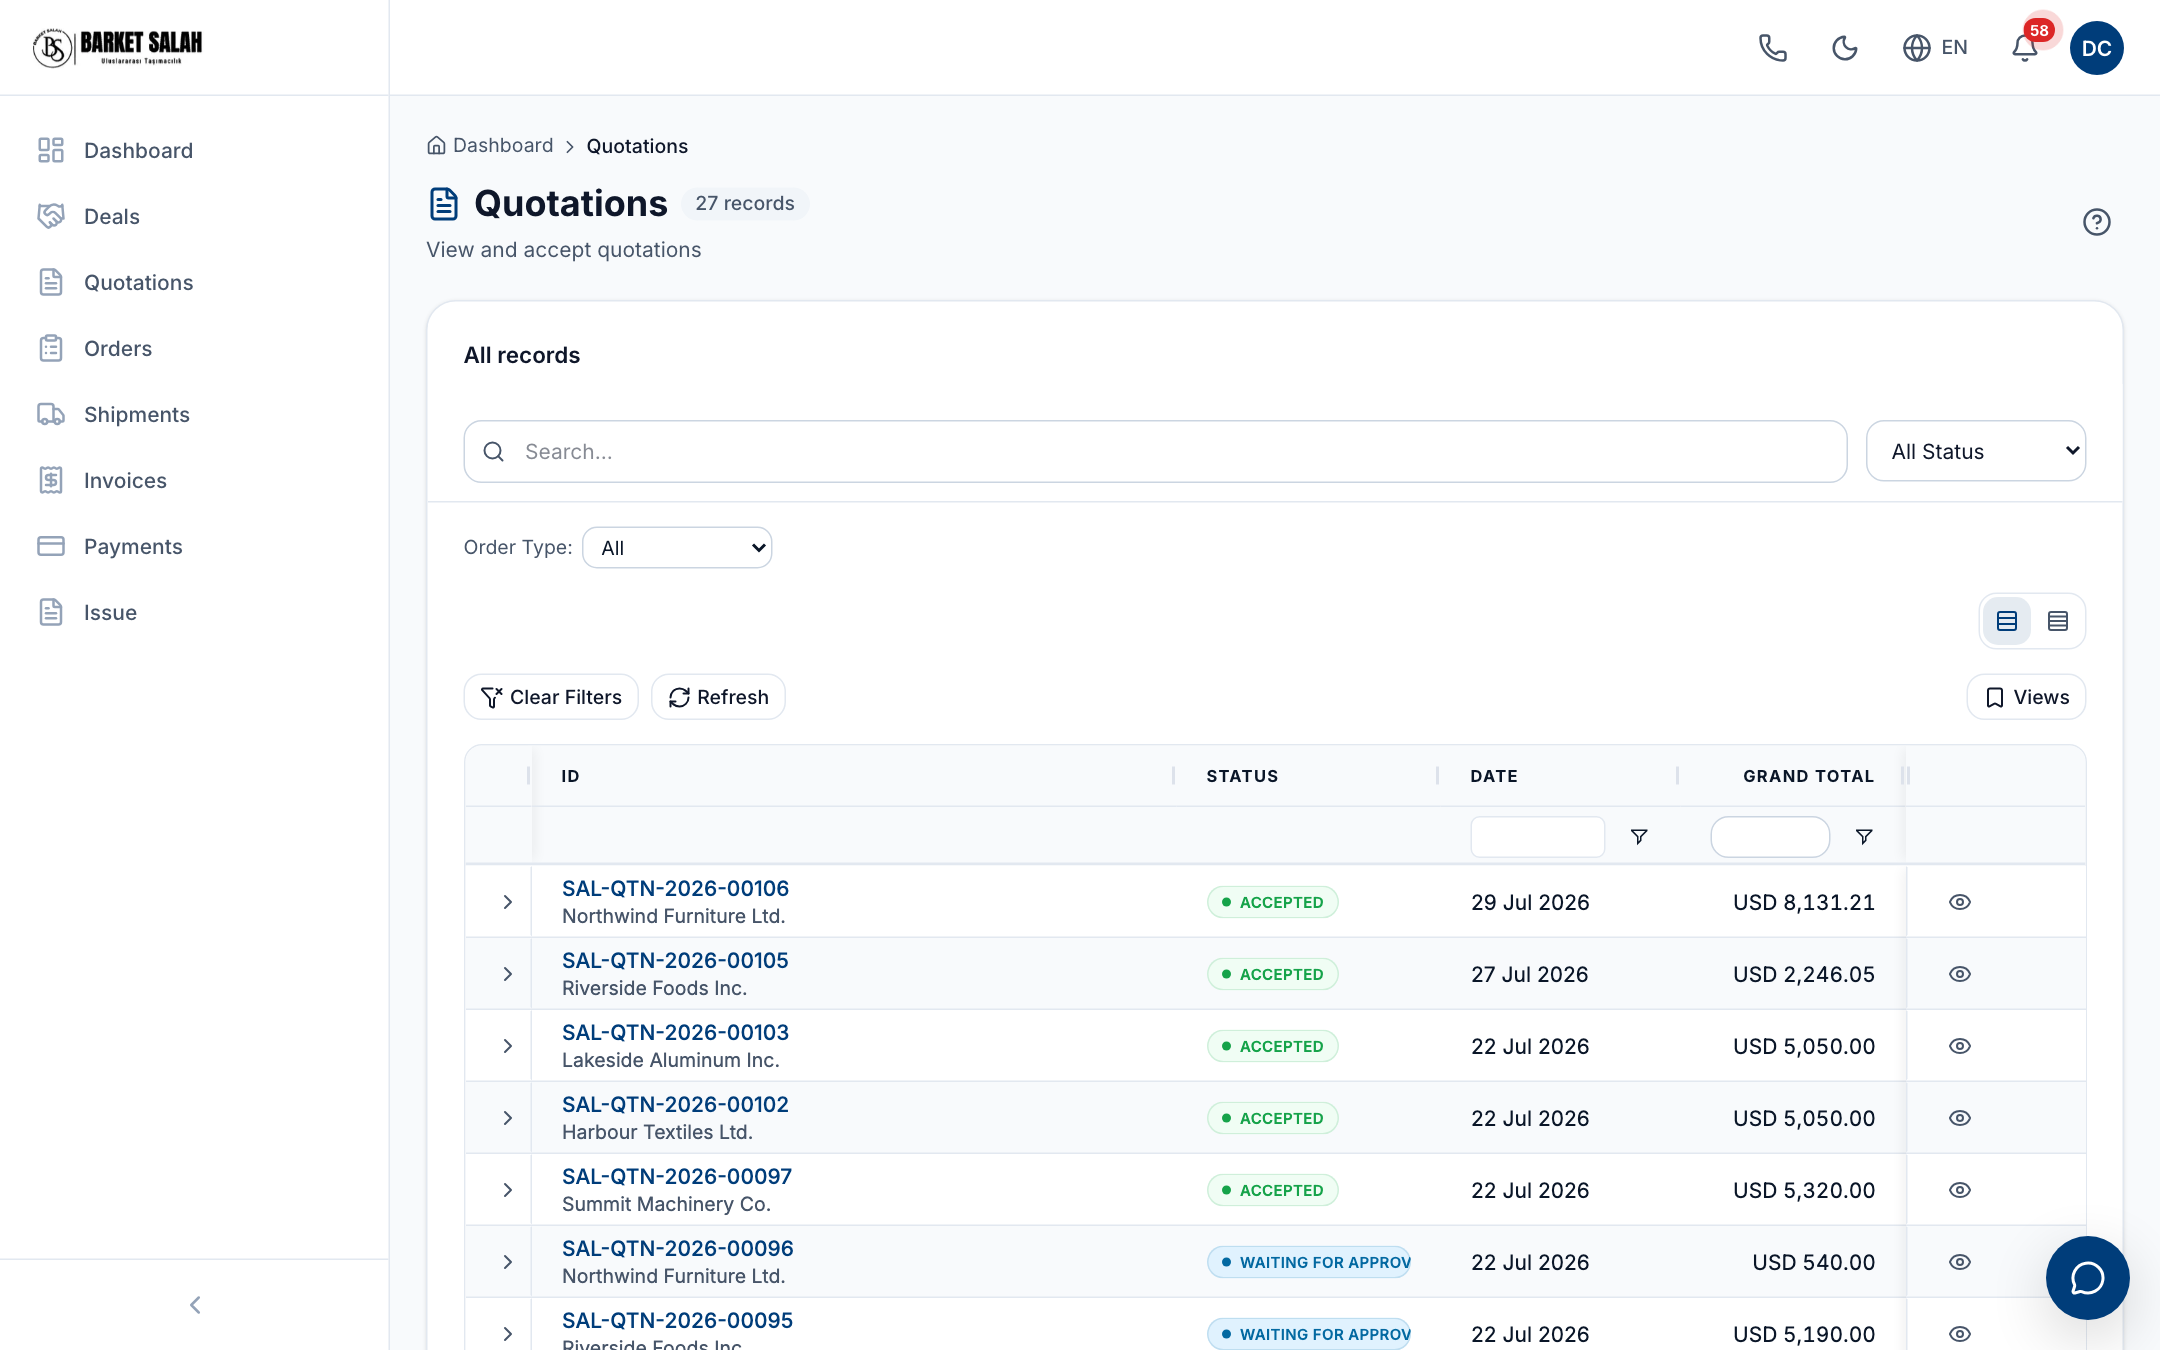
- 1. Click Quotations in the left menu to open the offers sent to you.
- 2. This badge shows how many quotations you have.
- 3. Type the quotation number you are looking for. The search matches the number, not the company name.
- 4. Narrow the list by status from here.
- 5. Each quotation's status is in this column. One colour means the offer is waiting for your answer; another means you already accepted it.
- 6. Click the eye icon at the end of a row to open the quotation's details.
- Click Quotations in the left menu. The offers sent to you appear in the list. An empty list means no offer is ready yet.
- Look at the Status column. Offers waiting for your approval can be accepted. Offers marked accepted, revision requested or not accepted are view-only.
- To find an offer, type its number in the search box at the top, or pick a status from the status box.
- Click the arrow on the left of an offer's row. A short summary opens: the carrier, the team's notes, the total amount and the last valid date.
- To see the whole offer, click View or Open full record in the summary. The price lines and the conditions are shown there.
- To accept an offer, click the Accept button in the summary you opened. This button only appears on offers waiting for your approval.
- In the Accept this offer? window, check the amount, then click Accept. If a Terms and Conditions window appears, read it, tick the box and click Accept Offer.
- In the Your quote has been accepted window, click Go upload my documents. The order page opens; upload the requested files there. If you are busy, click Upload Later and continue from Orders.
Watch out
Watch out
Tip
Orders
The Orders screen lists your confirmed jobs. Open an order to see its lines, and upload the documents we ask you for. If an order is missing paperwork, a warning bar appears above the list.
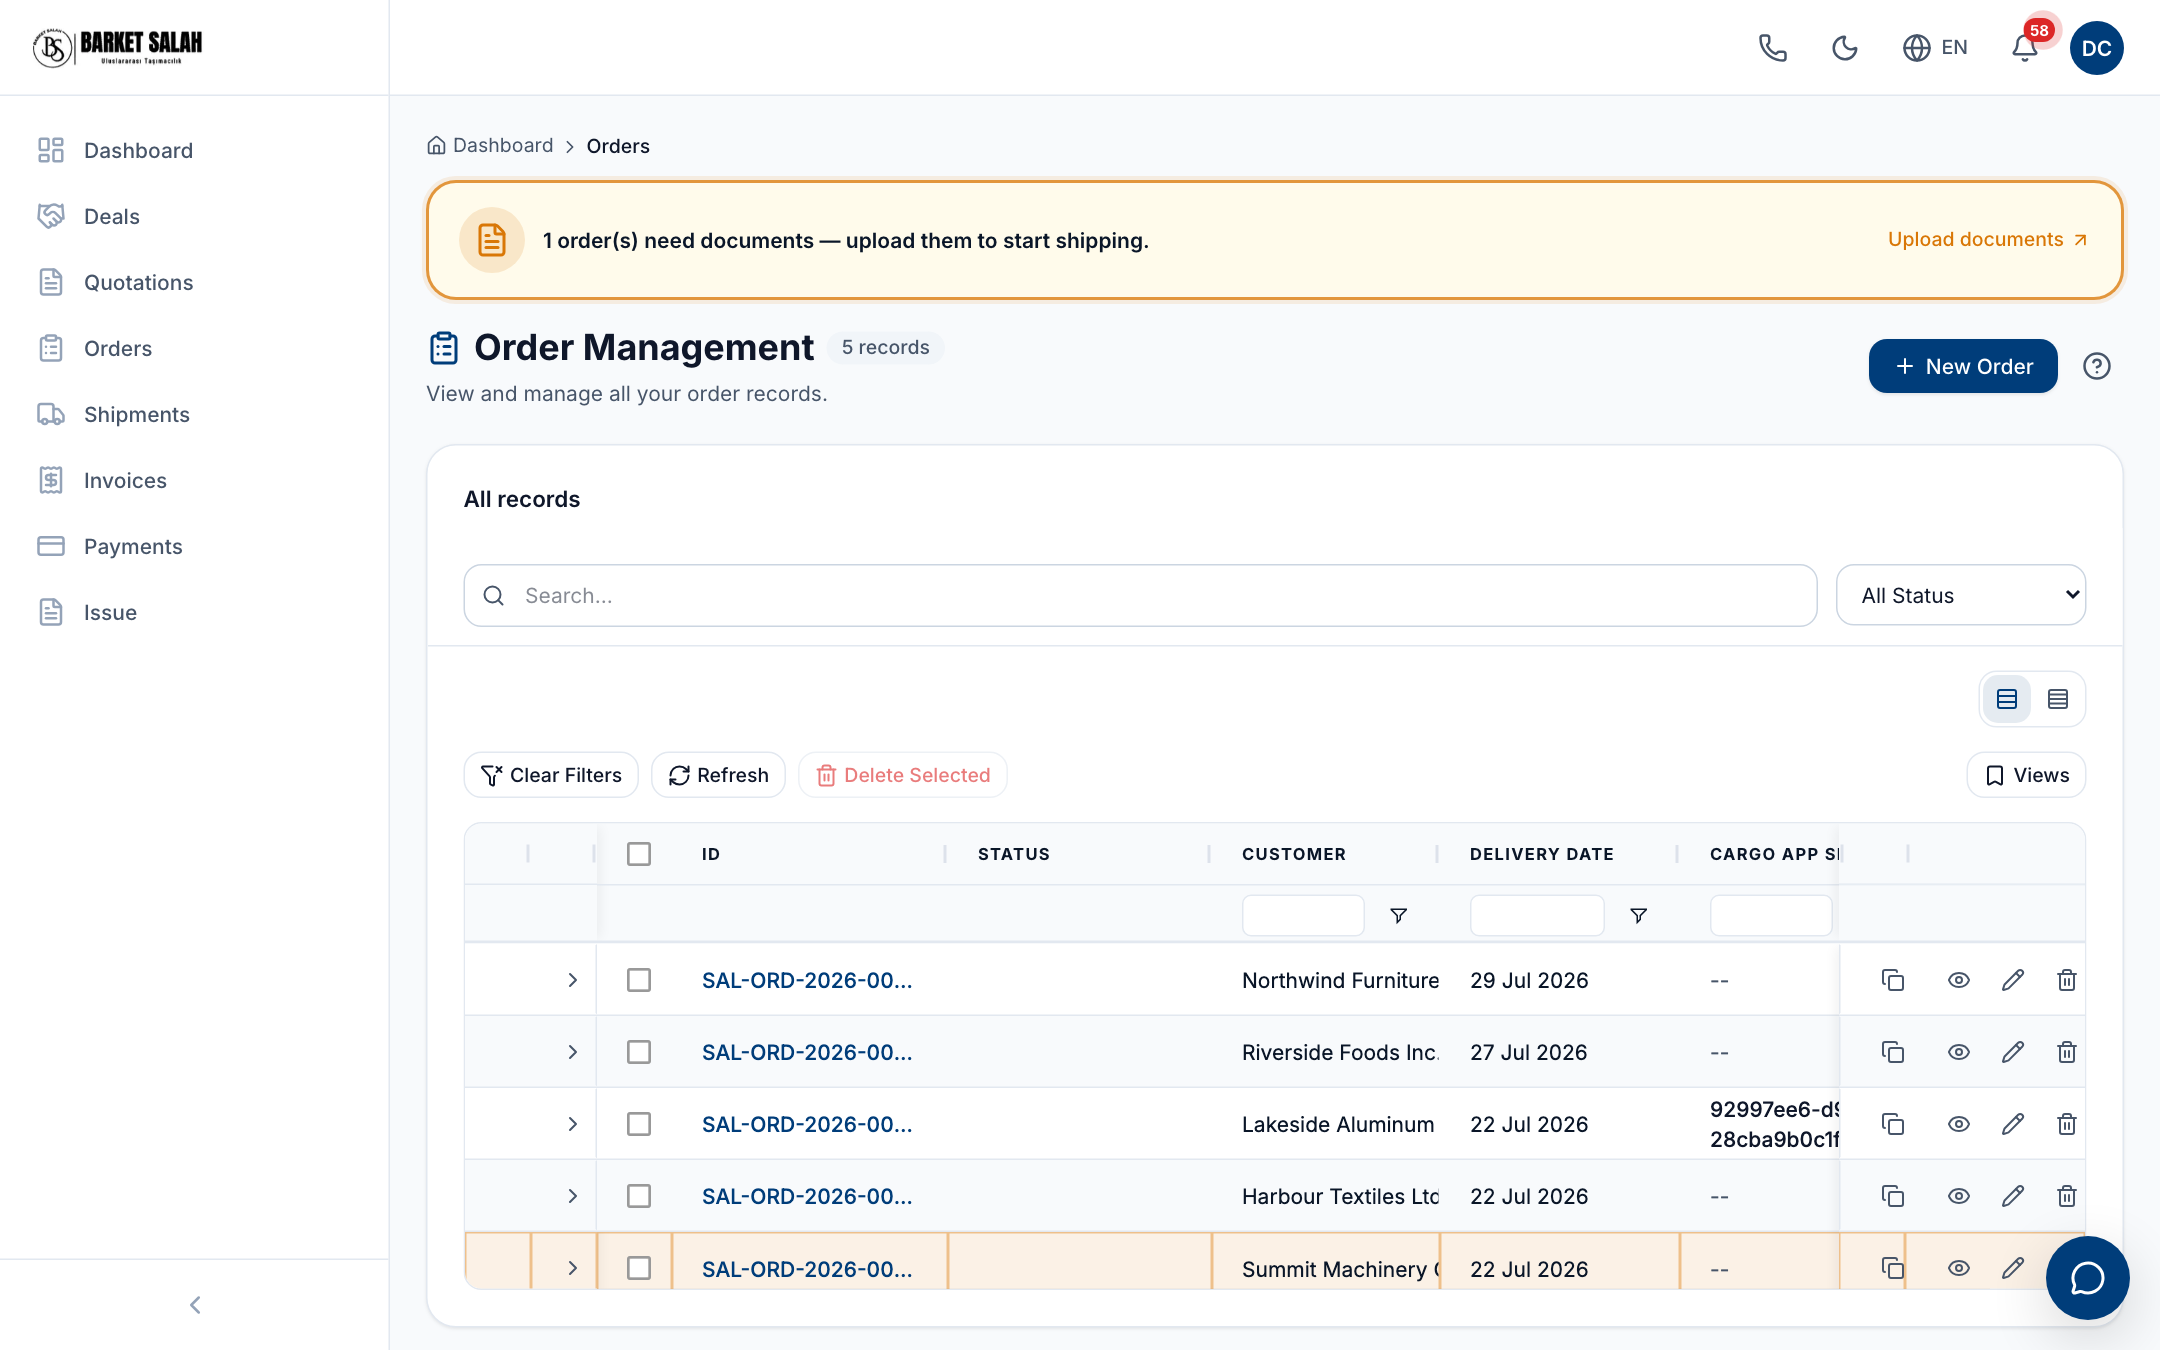
- 1. This bar shows orders still missing documents. Click 'Upload documents' on the right to upload them so shipping can start.
- 2. Click 'Orders' in the left menu to come back to the order list from anywhere.
- 3. Press this blue 'New Order' button to create a new order.
- 4. Type the order number you are looking for. The search matches the number, not the customer name.
- 5. Open this box to narrow the list down.
- 6. Click the blue order number to open that order's details.
- Click "Orders" in the left menu. Only your own orders are listed.
- If a yellow warning bar appears above the list, click it. It says "Upload documents", and clicking it leaves only the orders that are waiting for documents.
- Find the order you need: type its number into the search box, or narrow the list with the filter above it.
- Click the blue order number, or the eye icon at the end of the row. The order detail page opens.
- Click the tab with the small blinking dot next to it. That dot means documents are expected from you.
- In the "Customer Documents" section, find the missing row and click the "Upload" button. Pick your file in the window that opens. The file goes through a short check, then uploads.
- If a yellow warning appears, decide: click "Upload anyway" if the file is correct, or "Choose another file" if it is not.
- Check that the row now shows a green "Uploaded" mark. If you uploaded the wrong file, click "Remove" and upload the correct one again.
Watch out
Good to know
Tip
Tracking your shipments
The Shipments screen is where you follow the cargo that is already on the move. A live vessel map sits at the top of the page and the list of all your shipment records sits below it. Open a shipment and you see its route, its ports, its containers and the estimated arrival date.
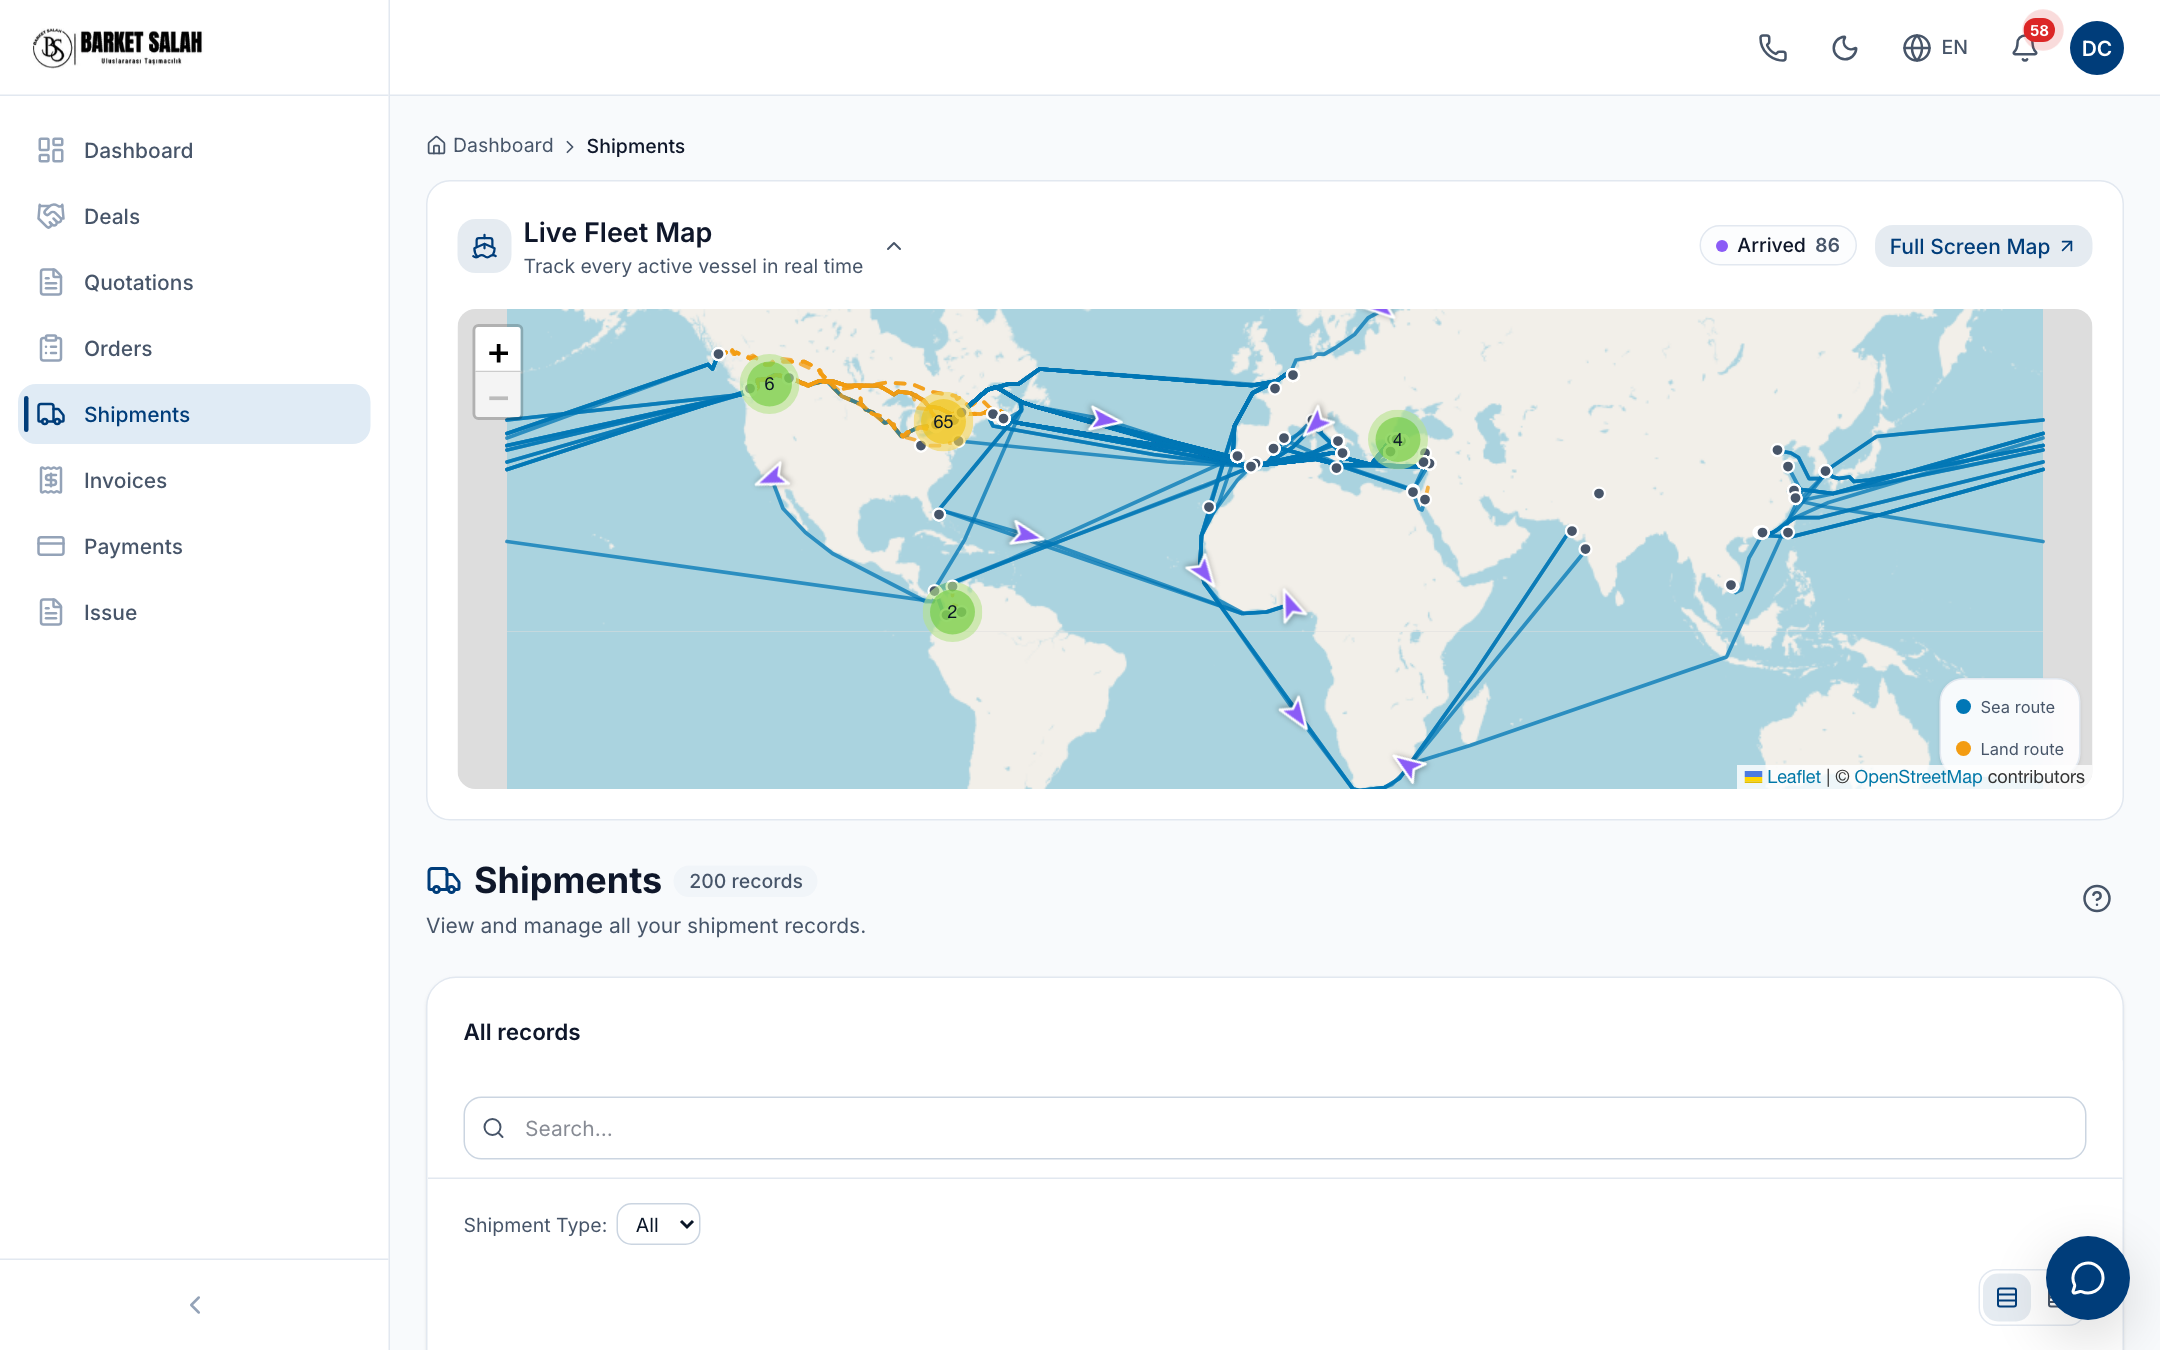
- 1. See the number of arrived vessels here.
- 2. Click here to open the map in full screen.
- 3. Track your vessels live on this map. Use the + button to zoom in.
- 4. The Shipments page is open. Use the left menu to go to another page.
- 5. Type the shipment number you are looking for here.
- 6. Pick a shipment type here to narrow the list.
- Click Shipments in the left menu. The Live Fleet Map opens at the top of the page and your shipment list opens below it.
- Click a vessel marker on the map. A small card opens with the vessel name, status, carrier and estimated arrival. Press the View Details button at the bottom of the card.
- Click Full Screen Map to enlarge the map. Search for a vessel or route in the panel on the left and narrow the list with the coloured buttons: In Transit, At Port, Delayed, Arrived. Press Back at the top left to leave.
- Type a shipment number in the search box to find one, or narrow the list with the "Shipment Type" filter underneath it.
- Click the shipment number in the list. The shipment's own page opens and shows that cargo's route and the vessel's latest position at the top.
- Look at the Route Information section. Journey progress is shown as a percentage, and below it the stops are listed: Pre-Carriage, Port of Loading, Port of Discharge and On-Carriage. If a stop's date says Actual, that step is done; if it says ETA, that date is still expected.
- Click a container row in the Containers section. The row expands and lists that container's movements, newest first.
- Download the paperwork from the Documents section. The Download all button saves every file for this shipment to your computer in one go.
Watch out
Tip
Good to know
Invoices
The Invoices screen shows every invoice the company has issued to you in one place. You can see which ones are paid, which are unpaid, how much is still owed and when the due date is. You can open an invoice and print it as a PDF or save it to your computer.
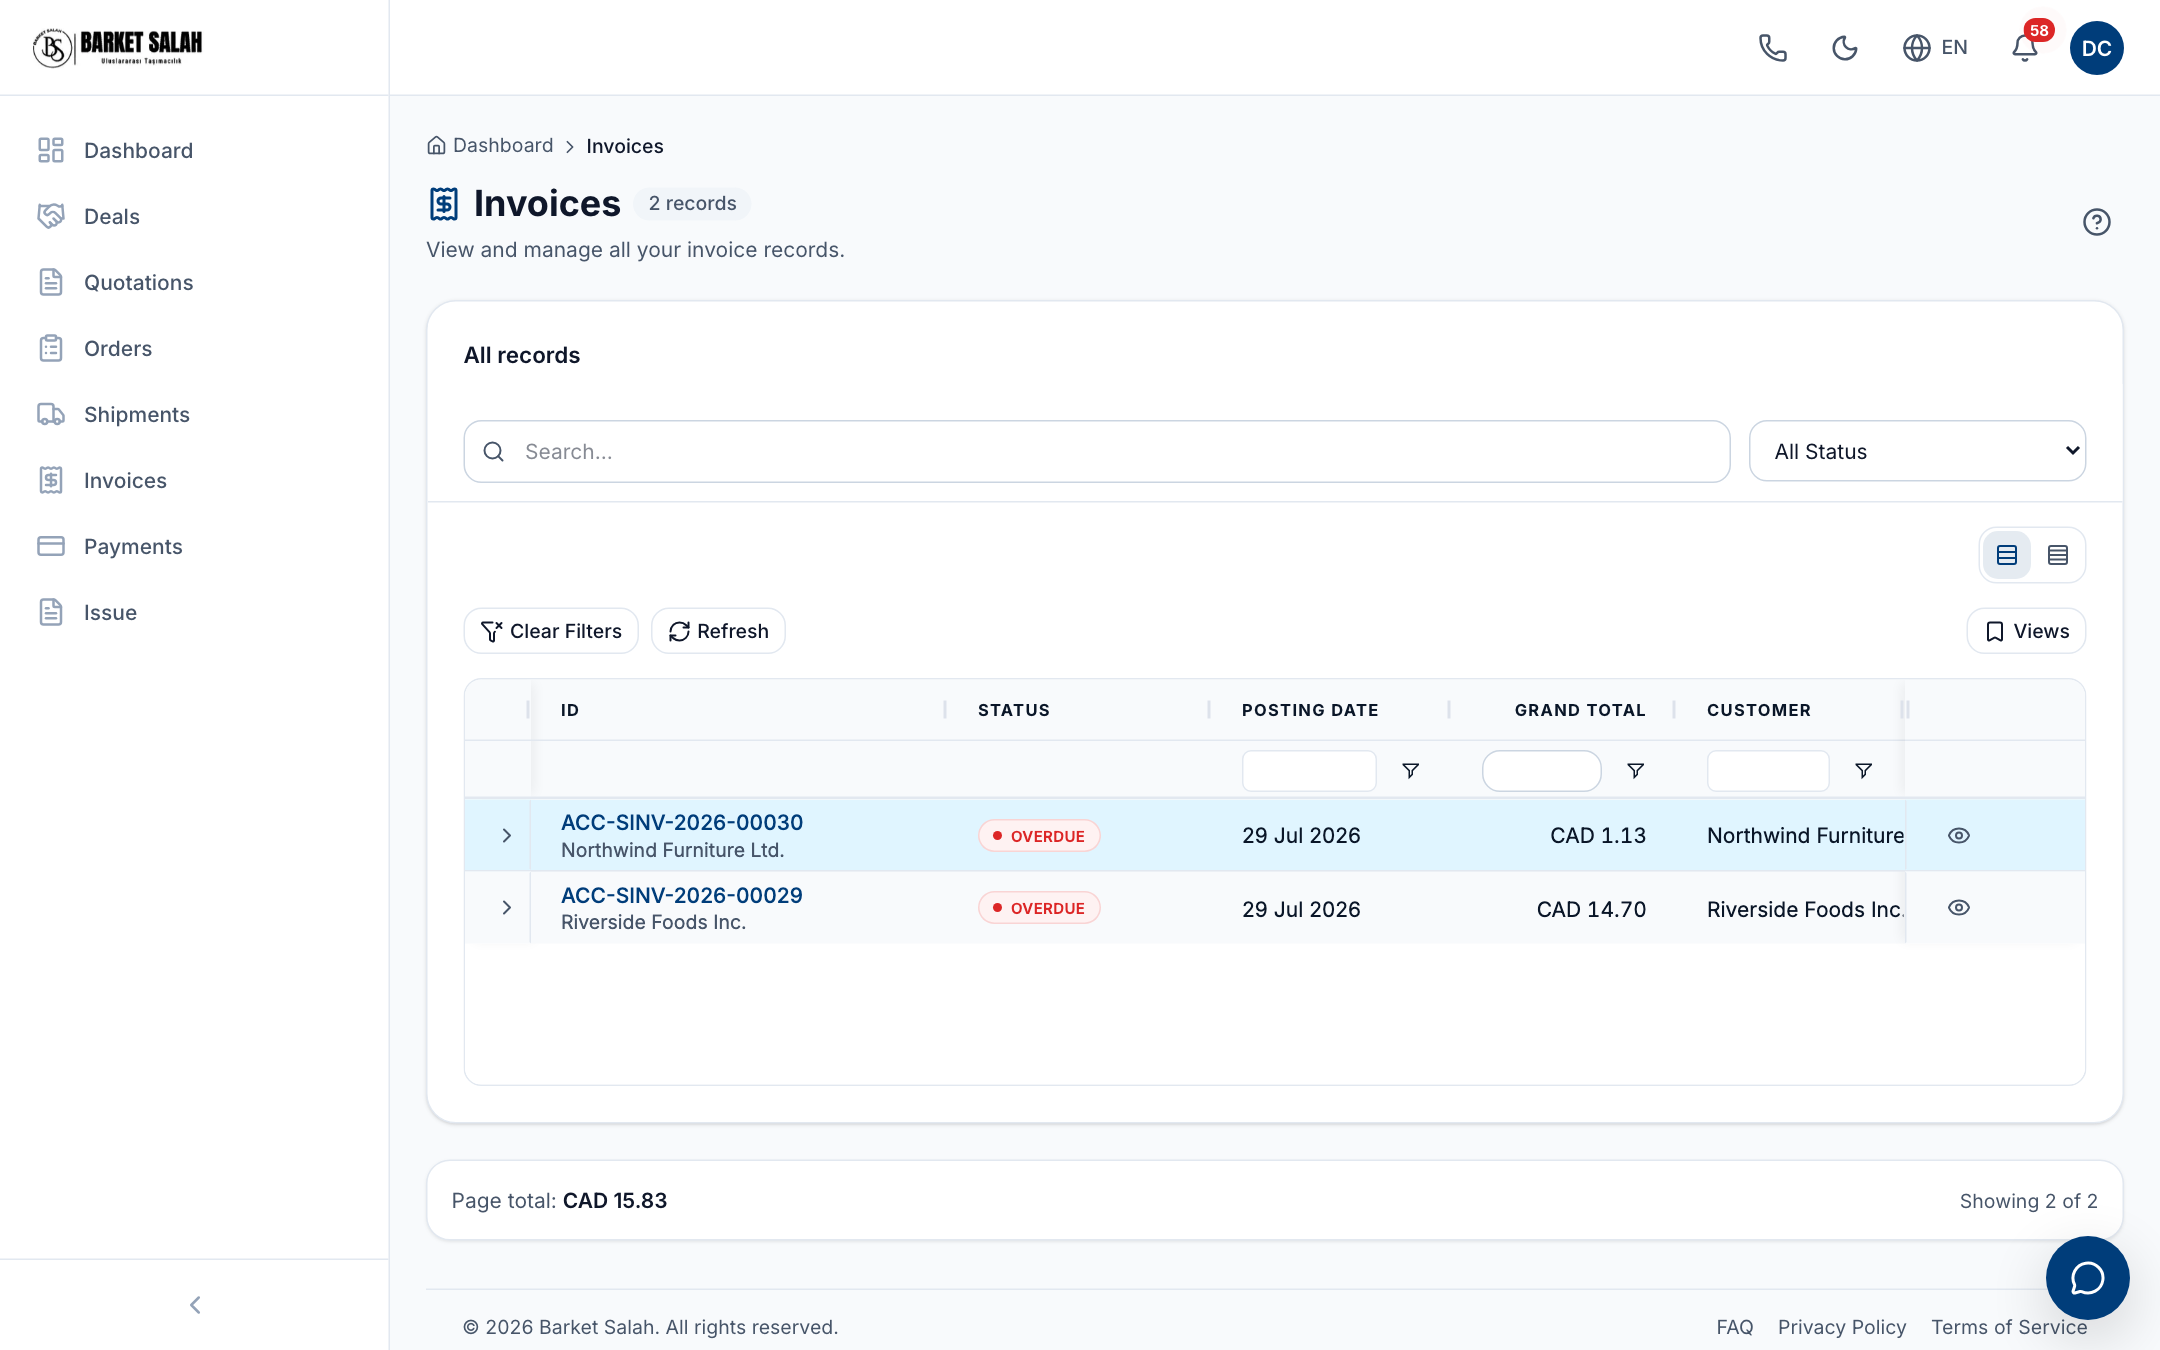
- 1. Type an invoice number here to find the invoice you want.
- 2. Pick a status from this box to list only invoices with that status.
- 3. Open the Invoices page from here.
- 4. Clears the column filters and the sorting on the table. It does not undo a choice made in the status box.
- 5. Click the blue invoice number to open the invoice details.
- 6. A red label in this column means the invoice is past its due date.
- Click "Invoices" in the left menu.
- Look at the list: each row shows the invoice number, its status, the date it was issued, the amount and the customer it was issued to.
- To find a specific invoice, type its number in the search box at the top.
- To narrow the list, open the status box and pick one status at a time — unpaid, overdue, or partly paid are separate choices. To see everything again, open the same box and choose the option that covers every status.
- Click the blue invoice number, or the eye icon at the end of the row. The detail page opens. The "Summary" card shows the status, total amount, remaining amount and due date.
- Scroll down on the same page. The "Payments" section lists the payments applied to that invoice. If there are none, the section does not appear.
- To save or print the invoice, click "Print" at the top right. The invoice opens as a PDF in a new tab.
- To go back to the list, click the "Back to Invoices" link at the top of the page.
Watch out
Tip
Good to know
Payments
The Payments page shows the payments recorded for your company. The accounting team enters these records; you only view them here. Each row is one payment, and opening it shows the full record — the amount, the date and the invoice it was applied to.
- Click Payments in the left menu. The payment list opens. The heading shows how many records you have.
- Read the list. Each row is one payment record, with its number and its current status. The columns shown depend on what the record holds, so open a payment for the complete picture. On a phone the same records appear as stacked cards.
- To find one payment, type its payment number in the search box at the top. The list narrows as you type.
- To see only one kind of record, open the status dropdown next to the search box and pick the status you want: records that are still being prepared, ones that are approved and booked, or ones that have been cancelled.
- To bring the full list back, open the same status box and choose the option that covers every status. If you typed something in the search box, clear that too.
- Click the arrow at the start of a row. A short preview opens under the row so you can see extra details without leaving the page.
- Click the blue payment number, or the eye icon at the end of the row, to open the full payment. The detail page shows the amount, date, payment method and the invoice lines the payment was applied to. Use Refresh at the top right to reload it, and Back to Payments to return to the list.
- If you want to know how much was paid on one invoice, open that invoice from the Invoices page. The Payments section at the bottom lists the payments applied to it.
Watch out
Tip
Good to know
Documents
The Documents screen gathers all the paperwork for your orders and shipments in one place. You can find, open and download files such as the bill of lading, commercial invoice and packing list here. The documents you are asked to provide are uploaded from the page of the related order.
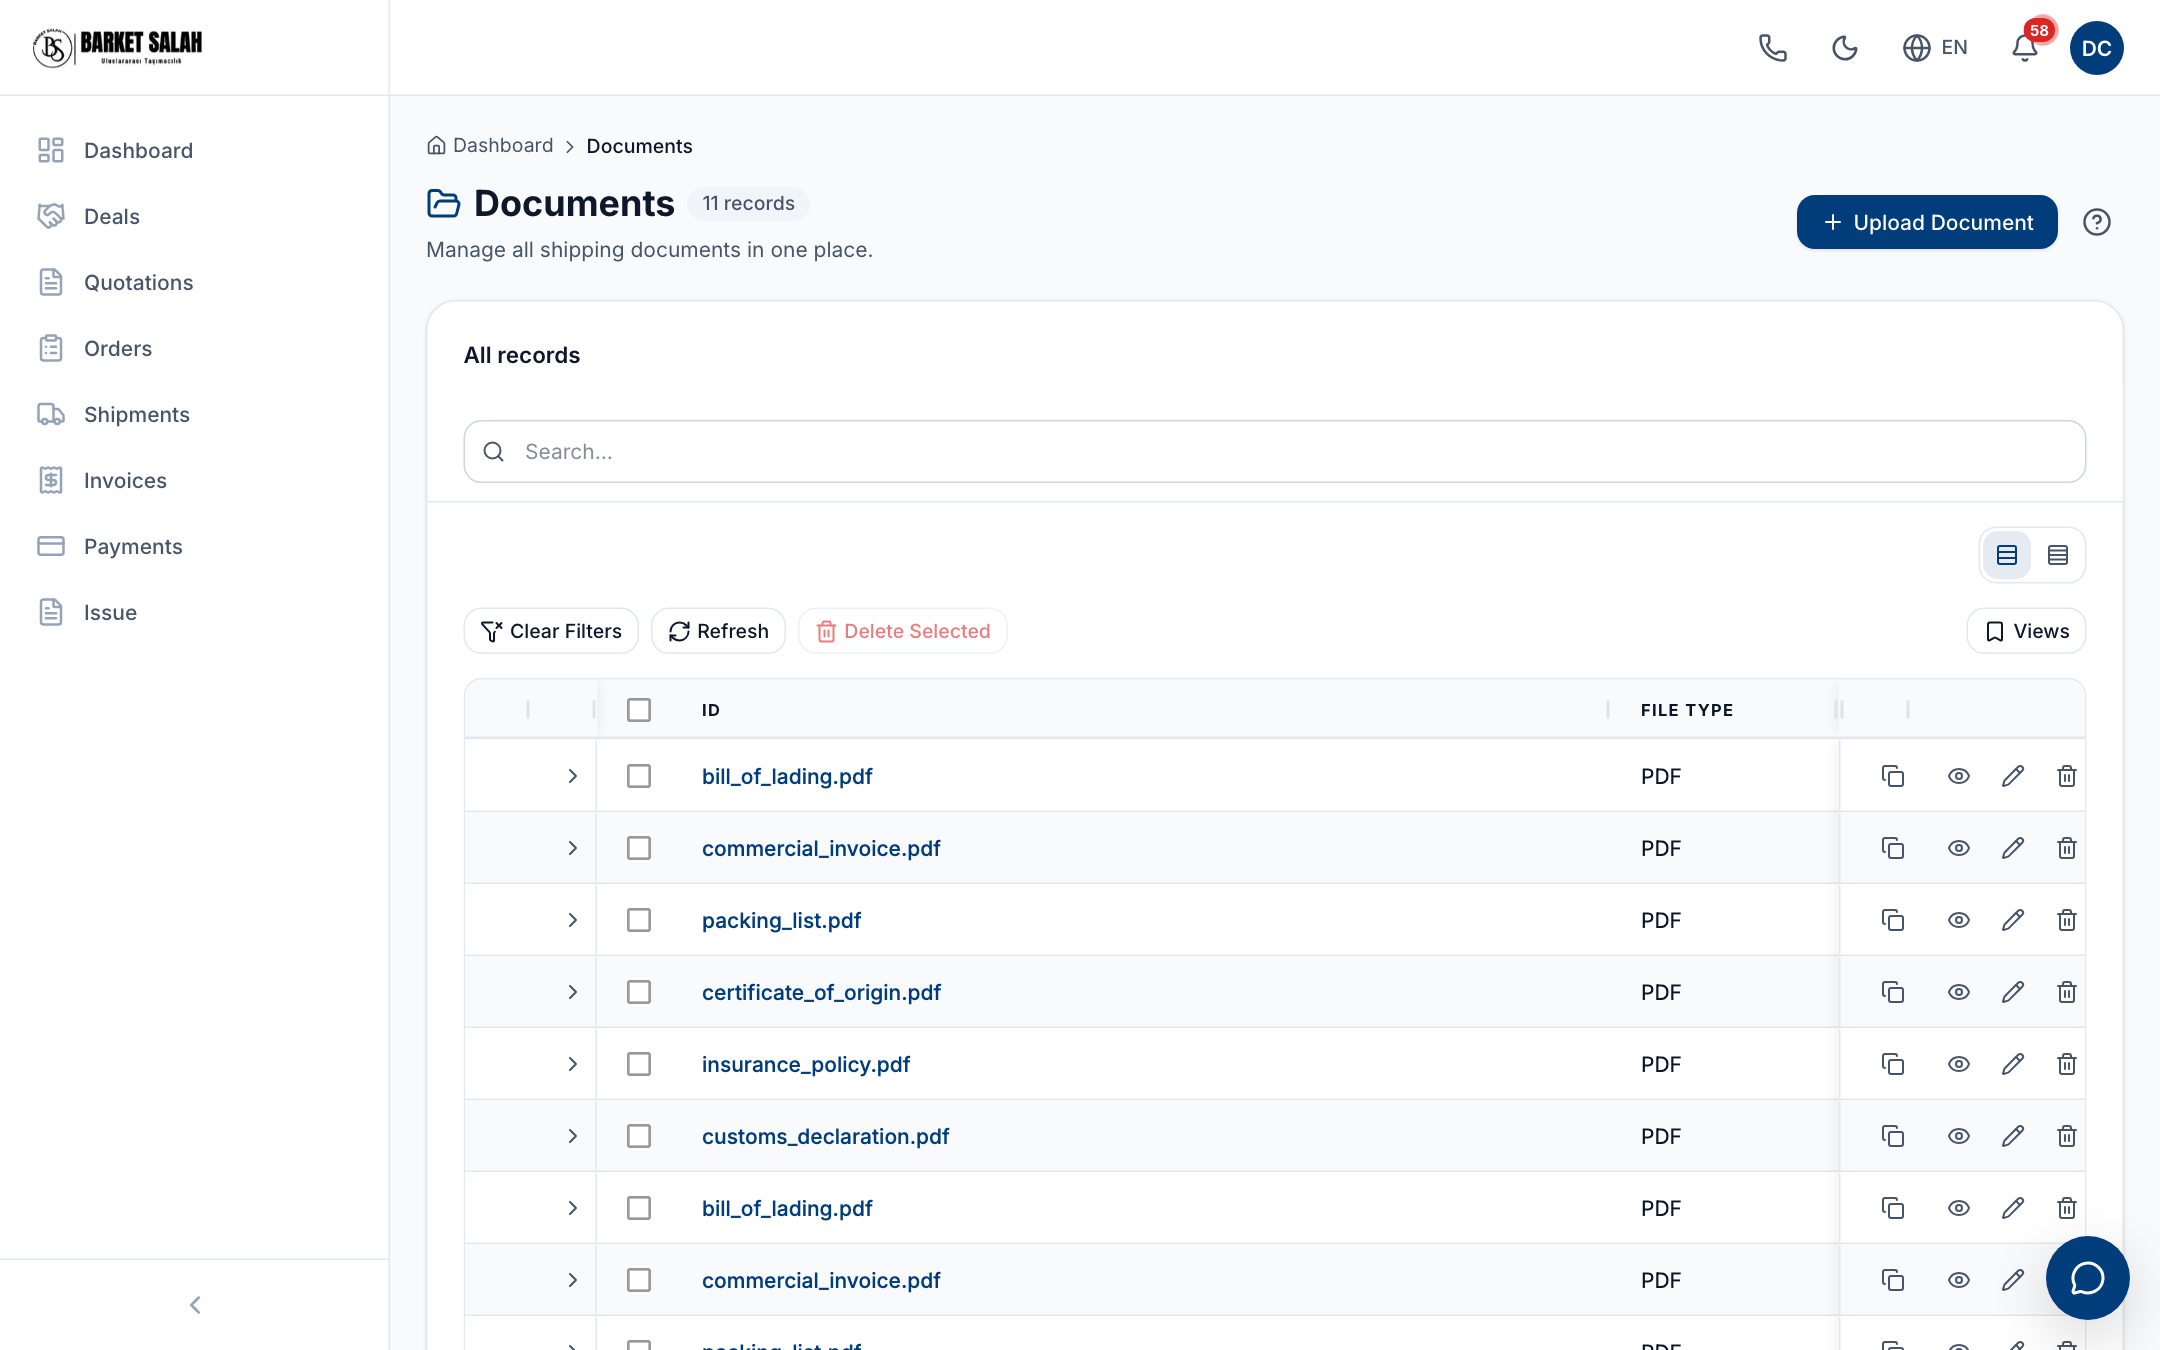
- 1. Use the left menu to switch sections. You are on the Documents page.
- 2. Click this blue button to upload a new document.
- 3. Type the document name here and the list filters instantly.
- 4. Use these two icons to change how the list is displayed.
- 5. Clear filters, refresh the list, or delete the documents you selected.
- 6. Use the row icons to copy, view, edit, or delete the document.
- The Documents screen collects every file already uploaded for your orders and shipments, so you can find one without hunting through orders. It is not in the left menu on this account.
- The list shows every file with its name and type. Use the search box at the top to find one, and the eye icon at the end of a row to open it.
- You can upload a file straight from this screen with "Upload Document". A document that was asked of you belongs on its order instead, where the request row is — the steps below show that.
- To upload a document that was requested from you, click Orders in the left menu and open the relevant order.
- Scroll down and find the Customer Documents card. Each row is one document. Rows marked Required must be filled in; rows marked Optional are not compulsory. Each row shows its state as Pending or Uploaded.
- Click the Upload button on the row you want to fill, then choose the file from your computer. The file goes through a short check, is uploaded, and the row turns to Uploaded. If a file is already there, the button reads Replace.
- If you uploaded the wrong file, click Remove on the same row. The row goes back to Pending and you can put the correct file in with Upload. If a newly uploaded file does not appear on the order page, click the Refresh icon at the top right of the card.
- To get all the paperwork for a shipment, click Shipments in the left menu, open the shipment and scroll to the Documents card. Click Download on a row for a single file, or Download all at the top of the card to get them all at once.
Watch out
Good to know
Tip
My account and security
The Account page is where your details are kept. You change your name, phone number and password here. You also verify your email and phone, and add a second lock to your account. Your email address cannot be changed here — write to support if it has to change.
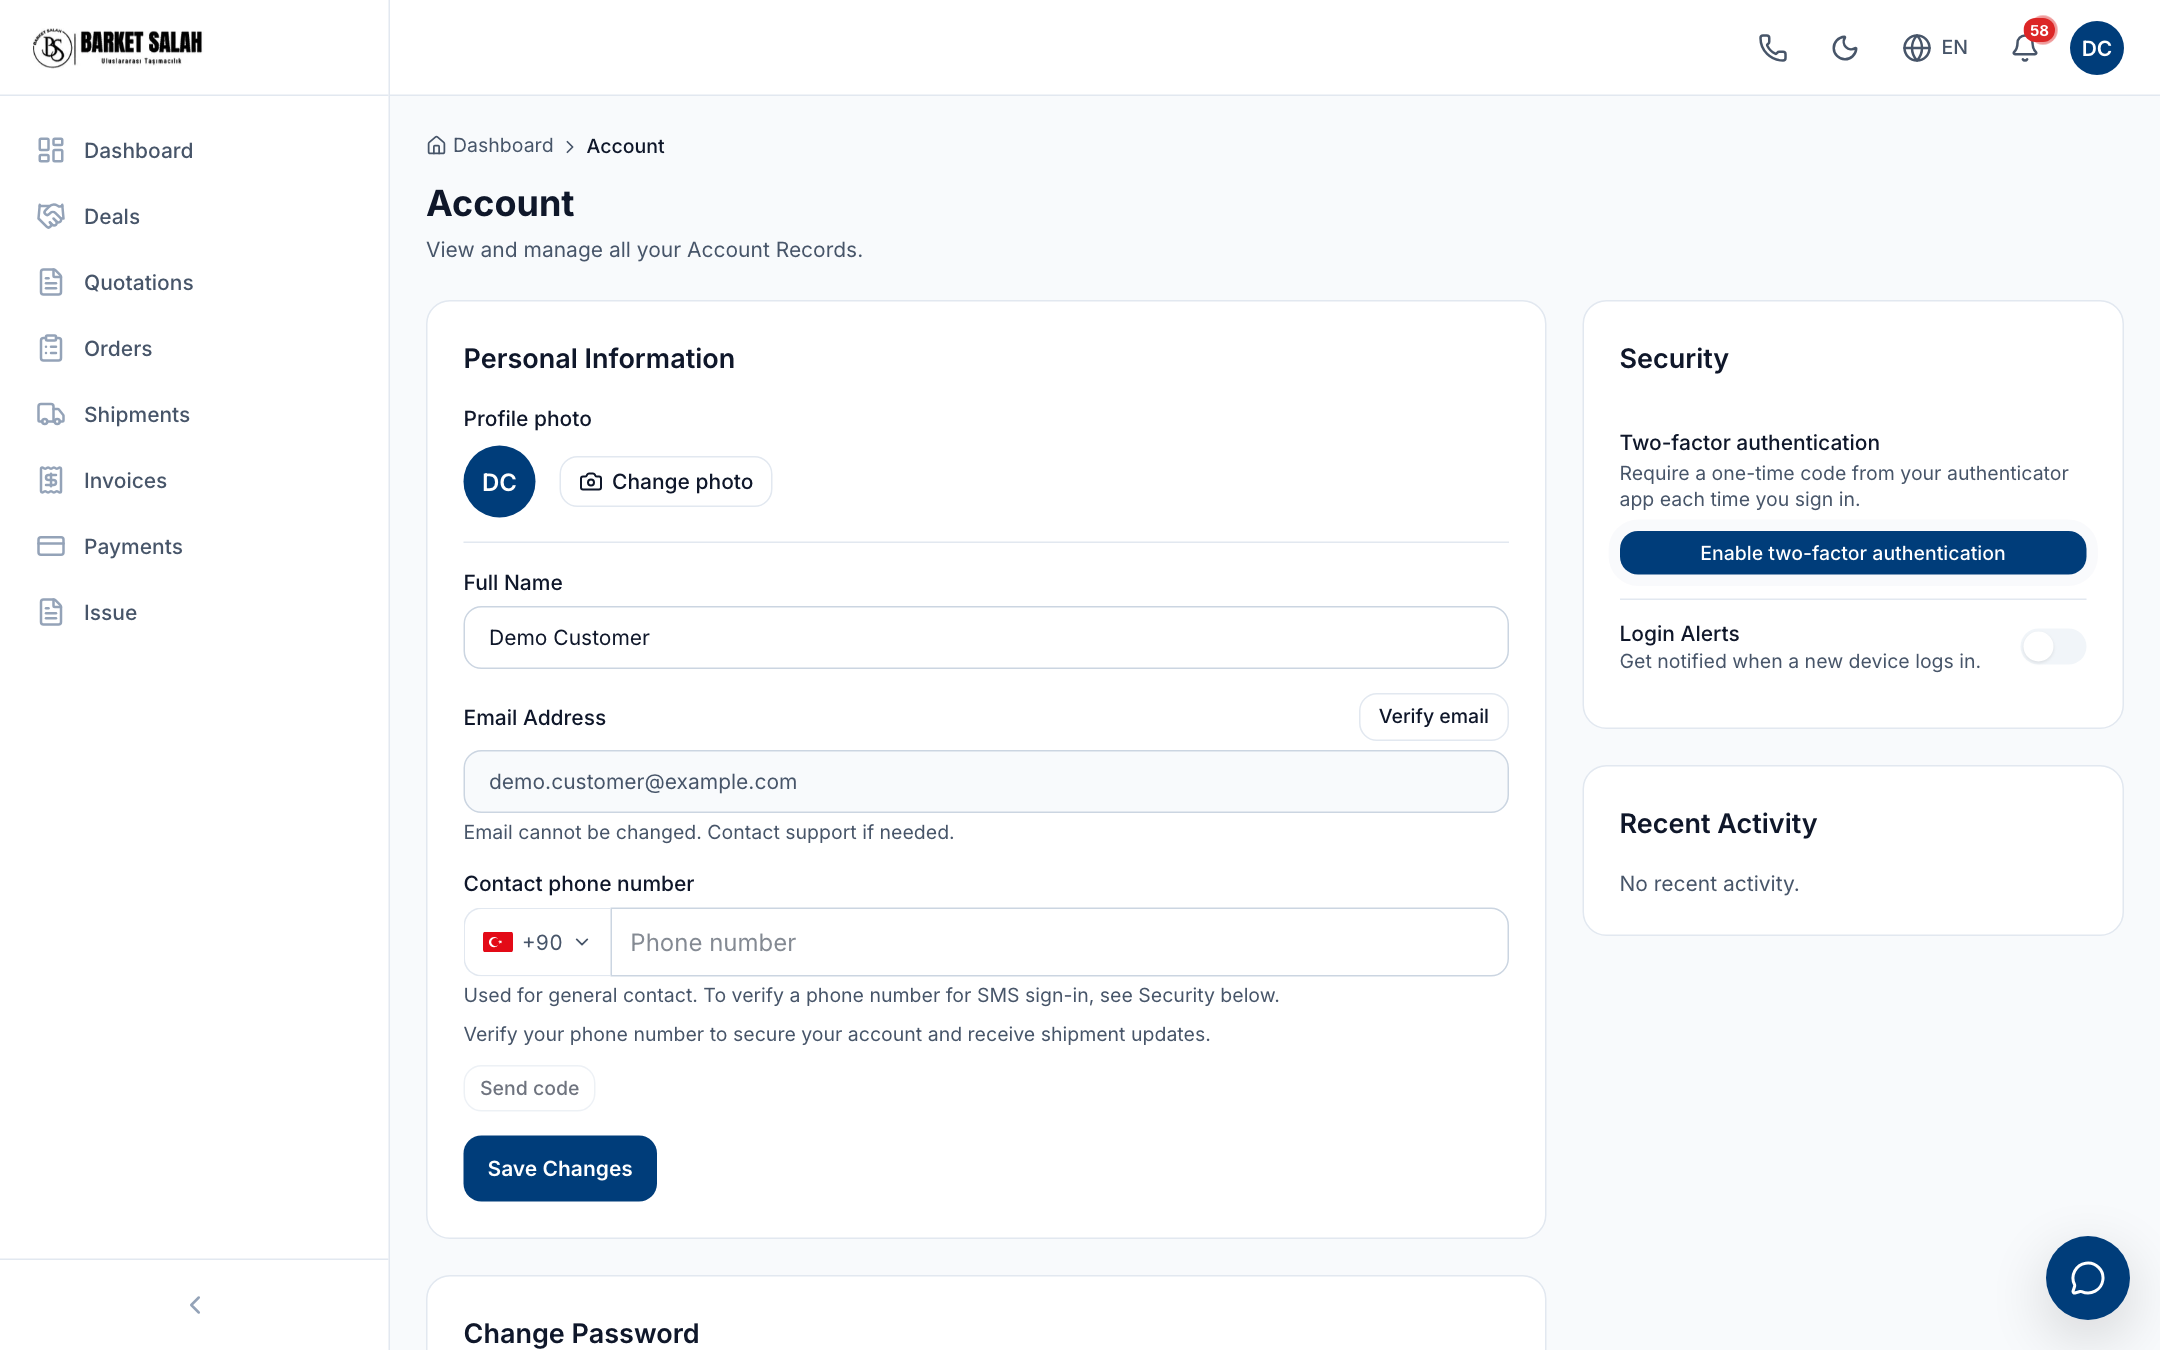
- 1. Click here to change your profile photo.
- 2. Press here to protect your account with a one-time code in addition to your password.
- 3. Type your first and last name here.
- 4. Press here to verify your email address; a verification link is sent to your inbox.
- 5. First pick your country code, then type your phone number here.
- 6. Press here to save the changes you made.
- Click the circle with your initials at the top right, then choose Account. On a phone, open the menu and find Account at the bottom.
- In Personal Information, fill in Full Name and Contact phone number. Then press Save Changes.
- Click the Verify email button on the right of the Email Address row. Then click the link that arrives in your email.
- Click the Send code button under the phone box. Type the 6-digit code sent to your phone and press Verify.
- In Change Password, type your current password, your new password, and the new password again. Then press Change Password.
- In the Security box on the right, click Enable two-factor authentication. Scan the QR code on screen with the authenticator app on your phone, type the 6-digit code the app shows, and press Verify & enable.
- Save the recovery codes on screen with the Copy codes or Download button. Tick the box that says you saved them and press Done.
- To be told when a new device signs in, switch on Login Alerts in the Security box. You do not need to save it; it is saved the moment you switch it on.
Watch out
Tip
Good to know
Notifications
The Notifications page collects every update sent to you in one place: your deals, orders, shipments and invoices. You can see at a glance which ones you have not read yet, and open the related record with a single click. Notifications are grouped by date, so the newest ones are always at the top.
- Click the bell icon at the top right. At the bottom of the small box that opens, click "View all". The Notifications page opens.
- Look at the list. Rows in bold, with a tinted background and a small dot next to them, are the ones you have not read yet. The number beside the page title tells you how many are unread.
- To find a specific notification, type a word into the "Search notifications..." box. The list narrows as you type.
- To see only the ones you have not read, click the "Unread" button. To go back to the whole list, click "All".
- Use the type list on the right to show one kind of notification at a time. It only offers the kinds you actually have, so it changes as new notifications arrive.
- To open the record a notification is about, click the notification itself. The related order, shipment or invoice page opens, and that notification is marked as read automatically.
- To mark a single notification as read without leaving the page, click the small check (✓) button on the right of that row.
- To clear them all at once, click "Mark all as read" at the top right. The counter resets and the page shows "All caught up!".
Watch out
Good to know
Tip
Troubleshooting
The things customers get stuck on most often, and what clears each one.
- The checkbox on the terms page will not tick
- You have not scrolled the terms to the bottom. Click inside the text and scroll down; the box unlocks when you reach the end.
- My password is not accepted
- All six lines must show a green tick: at least 8 characters, a lowercase letter, an uppercase letter, a number, a symbol, and no spaces. Missing any one of them blocks the password.
- I added a symbol but the symbol line is still red
- Currency signs such as £ € ₺ do not count. Use a standard keyboard mark: ! ? # % * - _ @.
- My password has a space and is refused
- Spaces are not allowed. If you pasted the password an invisible character may have come with it, so type it by hand.
- The Next or Submit button does nothing
- A required field is empty. Scroll up and fill in the field marked in red.
- I picked a saved address but the fields stayed empty
- The address details take a few seconds to arrive. If they do not, pick another address and switch back.
- There is no New button on the Invoices screen
- That is correct. Invoices, payments, shipments and quotations are created by us; you only view them. What you create yourself is a deal request, and an order when you need one.
- I signed in but the list is empty
- A filter is still on. Open the status box above the list and choose the option that covers every status. If you also typed something in the search box, clear it.
- The verification code never arrived
- The code is sent to your phone by text message, not to your email. Check the number shown on screen is the right one, and wait for the 60-second countdown before asking for another.
- My phone number is not accepted
- Pick the country code from the list on the left instead of typing it again inside the number.
- I was signed out on my own
- A session stays open for three days and then closes for security. Just sign in again.
- I forgot my password
- Click "Forgot Password?" on the sign-in screen. Set a new password from the link in the email, then sign in.
- I cannot enter the two-step code, my phone is not with me
- Click "Use a recovery code instead" on the code screen and enter one of the codes you saved during setup.
- I accepted a quotation but no order appeared
- The order is created within a few minutes. Press "Refresh" on the Orders screen; if it is still missing, contact us.
- My document will not upload
- The file may be too large, or the connection dropped. Try a smaller file; if it continues, email the file to us.
- The screen came up half-loaded or is stuck on grey bars
- Refresh the page (F5). Grey bars appear while data loads and fill in within a few seconds.
Frequently asked questions
Short answers to the questions we are asked the most.
- Does the portal cost anything?
- No. The portal is free for our customers; you only pay for the transport service itself.
- When will I get my quotation?
- After you submit your request our team prepares the price. It appears on the Quotations screen and you get a notification.
- Can I edit a deal request after sending it?
- Not after it is submitted. A draft can still be edited; for a change on a submitted request, contact us.
- What happens when I accept a quotation?
- The accepted quotation becomes an order and appears on the Orders screen. We then ask you for the documents we need.
- Where is my shipment?
- Open the Shipments screen. Each shipment's current status and estimated arrival are shown there.
- How do I download my invoice?
- Click the blue invoice number on the Invoices screen, or the eye icon at the end of the row, and download it from the page that opens.
- Can I pay through the portal?
- No. The Payments screen only shows your payment history; payments are made through the bank.
- Which documents do I need to upload?
- The documents we need are listed on your order's detail page. Orders waiting for documents are also marked.
- How do I change my password?
- Open the Account screen and use the Change Password card. If you cannot remember your current password, sign out and use the forgotten-password link on the sign-in screen instead.
- How do I make my account more secure?
- Turn on two-step verification from the Account screen. Be sure to save the recovery codes it gives you.
- How do I change the language?
- Click the language code next to the globe icon at the top right and pick your language.
- Which languages are supported?
- English, Turkish, German, Italian, Russian and Arabic. Arabic is displayed right to left.
- Can I use it on my phone?
- Yes. The portal adapts to a phone screen; the menu opens from the icon at the top.
- Can a colleague also open an account?
- Yes, a company can have more than one user. Let us know so the new user is linked to your company.
- Can anyone else see my data?
- No. Each account only sees its own company's records.
- Where do notifications come from?
- Your notifications are created as work on your account moves along. They appear under the bell at the top right, and the Notifications screen lets you filter them by kind.
- Which details are required at signup?
- First name, last name, email and password are required. Choosing Company also makes the company name required; phone is optional.
- Who do I contact if something goes wrong?
- Write to us from the chat bubble at the bottom right, or reach us from the phone icon at the top.
Glossary
The freight words you meet in the portal, in everyday language.
- Shipment request (shown as "Deal")
- The form where you tell us what you want to ship; you fill it in and send it, then we prepare a price.
- Quotation (offer)
- The price we send back for your request; if you accept it, it turns into an order.
- Order
- The accepted offer turned into real work; from here on we start preparing your cargo.
- Shipment
- Your cargo once it is on the move; you follow where it is live in the portal.
- Container
- The big metal box your cargo travels in; it loads onto a ship, train or truck in one piece.
- Incoterm
- A short code that says at which point on the journey the cost and the responsibility pass from you to the other side.
- FOB
- You pay up to the moment the cargo is loaded onto the ship; after that the buyer pays.
- CIF
- You pay the transport and the insurance until the cargo reaches the arrival port.
- EXW
- You only get the cargo ready at your own door; every cost after that is the buyer's.
- Bill of Lading (B/L)
- The official paper showing the carrier took your cargo; the goods are collected at arrival with it.
- Loading point
- Where the cargo starts its journey; either your own address or the port where it goes on the ship.
- Delivery address
- The full address where you want the cargo finally dropped off.
- Customs
- The government check where cargo gets permission to enter or leave a country; your papers are reviewed here.
- Freight charge
- The charge for carrying the cargo from one point to another; insurance and customs are counted separately.
- Transport mode
- How the cargo travels: by ship, by plane or by truck.
- Sea freight
- The cargo goes by ship; the cheapest way, but it takes the longest.
- Air freight
- The cargo goes by plane; the fastest way, but the most expensive.
- Road freight
- The cargo goes by truck; used for door-to-door moves and shorter distances.
- Draft
- A record you saved but have not sent to us yet; nobody sees it until you press Submit.
- Invoice
- The bill that shows how much you owe and by which date.
- Payment
- The money you send against an invoice; once it arrives, the invoice is marked as settled.
- Saved route
- A route and address you used before, kept on file so you can pick it in one click next time.